Tutorial Sound
The liveSHOWsoftware allows you to open multi-channel sound files and play them back on multiple sound cards.
you need:
- A computer on which the LiveShow software is installed. (java must be installed too)
- The computer must have at least one sound card
- A sound system or active boxes, etc.
The principle:
- Pieces of music or parts of it are added to the timeline
- When playing a project, the Timeline mixes all the soundtracks, the result is sent to the sound card
- The sound card output is connected to a sound system, via which the sound can then be heard.
Step 1 load sound file
Menu ( Sound) -> (
  Load Sound File)
Almost all standard formats can be opened.
Internally the liveSHOWsoftware uses the wav audio format (PCM 44100 Hz, signed 16bit, little endian).
If you open a video or other file formats, so they are automatically
converted and a wav file is created, which gets the name of the
original plus an extension (_PCM_44100....) and is placed in the folder
of the original file.
The number of audio channels corresponds to the number in the original.
For example, if you want to change the number of audio channels, you can alternatively use the Video/Sound Converter to convert a sound file or extract the sound from a video.
You can also load multi-channel sound files (5.1, 7.1). Later sound lines
can be assigned to each channel. This technique works only if the
sound has no phase shift (time delay) between the front and rear
channels.
CAUTION: You should always copy sound files to your hard disk before you open them, in a folder that has no restricted user rights.
It is not
possible to open sound files from a data CD because the program has to
create two auxiliary files for the sound file and this is not possible
on a CD. The program
leaves the sound files at the original position when saving a project.
If you have loaded it from a USB stick and the stick no longer exists
after opening a project, the sound file will not be found anymore !
Note 1: In general, when
naming your files, make sure that the name is unique, that is, sound
files are not just called 'Track1' but contain the title and the artist in the
filename.
Note 2: File names
should not contain special characters, umlauts, or punctuation marks
(this could lead to problems in the file system of some operating
systems).
After you have loaded a sound file, a window will appear Soundview:
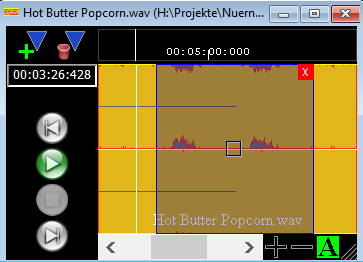
In this window, the sound file is displayed as curves. You can listen to the sound, insert the marker, and specify a range - see Soundview.
To specify a
range within the sound, click the curves with the left mouse button,
hold down the button, and move the mouse horizontally.
Note:
In order to
display the curves quickly, the sound file is analyzed and a graphic
file is created with the same name and the suffix .lsg.
The markers are automatically saved in a file with the same name as the sound file, and the .lsm extension.
Step 2 Drag the sound file or an area from it into the Timeline
menu: ( Windows) -> (
 Timeline)
To add the
entire sound file to the Timeline, click the curves with the left
mouse button, hold down the mouse key and drag it to a sound track of the Timeline.
To bring only a
portion of the sound file, a section, into the Timeline, click with the
left Maustatste in the blue area, hold down the mouse key and drag the area
into a sound track of the Timeline.
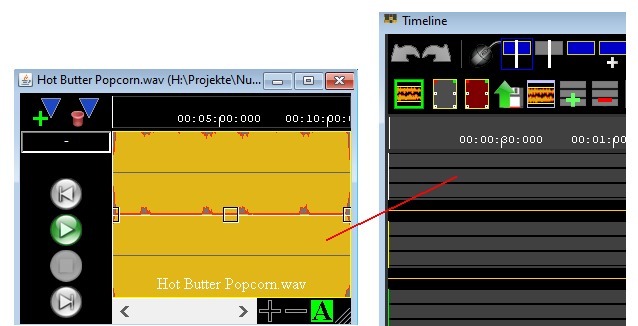
A sound object is now being created in the Timeline. 
The sound object has three small squares, handles. When you click on a handle with the left mouse button and hold down the mouse button, you can move the handles.
The
left handle determines the fade in behavior, the right handle
determines the fade out behavior, and the middle handle determines the
volume of the sound.
If you
double-click on an object, the object settings for this object open,
here you can enter the fade behavior and the volume numerically.
In addition, you can
also define in the object settings which channels of the sound object
are assigned to which sound lines - see Sound Lines.
Step 3 Arrange sound objects in the timeline and insert scene transitions:
In Timeline, you can arrange the sound objects and insert scene transitions.
menu: ( Windows) -> ( Timeline)
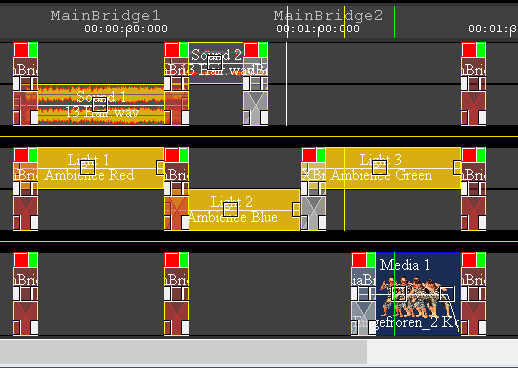
The objects can be moved in the timeline, the objects must be selected for this purpose.
To select an object, click in the lower half of an object, a selected object gets a blue background - see Timeline.
Note: Unmarked objects can not be moved, which is a safety measure to prevent accidental movement.
.
Step 4 Set the sound card for the sound output
( Sound) -> (  Sound Card)
This opens a window where you can select the sound card to output the sound.
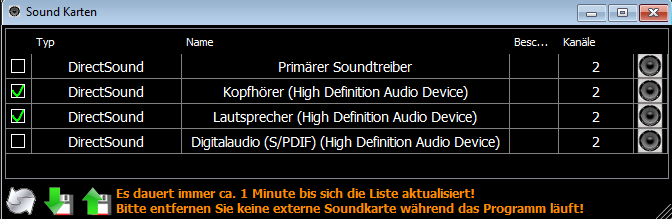
All connected sound cards with an output are listed here. You can choose over which sound cards the sound should be played back.
Step 5 save Project:
Under the menu: ( Project) -> (
 save Project)you cab save a project.
The software saves the project data in several files, so you should create an extra folder for each project !!
When you exit the software, you are always asked if the current project should be saved.
Conversely, you can also open a saved project again: menu ( Project) -> ( load Project)
Step 6 Play project / show:
To play a project, you have the following options:
- Scenbook
menu: ( Windows) -> ( Scenebook)
- Play Control
menu: ( Windows) -> ( Play Control)
The remote control can also be adjusted via a wireless mouse.
- Remote remote control via Android device
menu: ( Settings) -> (
 RemoteSettings)
- Timeline
menu: ( Windows) -> ( Timeline)
If necessary, step 7 export Project
( Project) -> ( export Project)
The software leaves all sound files and media files when saving a project at its original positions. To export a project to another computer, you should export the project.
When exporting, all sound files and media files are copied to the export folder. You can open an exported project as normal as a saved project.
Exported projects and stored projects differ only in that the sound / media files are copied during an export.
Another difference when exporting is that you have the possibility to save only part of a project.
This allows you to export certain scenarios, such as a thunderstorm, and import them back into other projects ( Project) -> ( import Project).
If necessary, step 8 Sound Trackbouncing
( Sound) -> (  Trackbouncing)
You can save selected sound items in the timeline as a one sound file.
In other words, all selected sound objects in the timeline are merged and stored in a sound file.
It is also possible to save the sound of a complete project in one or more sound files.
If necessary, step 9 List of all used sound files
( Sound) -> (  Sound List)
Here a window opens, in which all sound files used are displayed.
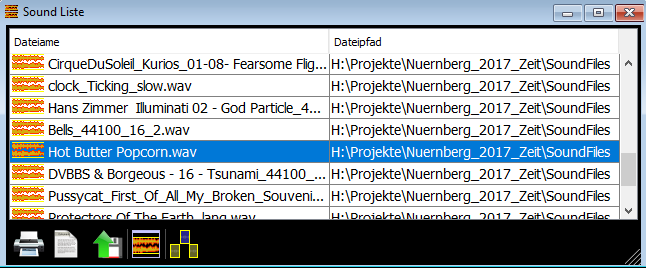
You can print this list, open new sound files, show up where a sound file is used in Timeline, etc.
Problems with the headphone output on Windows laptops:
Most Windows laptops use the Realtek sound driver. Very often, the
power-saving function is activated, and this cannot be turned off with
simple on-board tools.
The power-saving function causes the sound card to go into a kind of
sleep mode after some time of inactivity (often even less than 30
seconds) and it has to be woken up again when it is used again. This
causes a delay in the playback of sound.
This can be seen in the timeline of the liveSHOWsoftware, if you stop
the playback, start it again after some time and then the sound cursor
starts delayed.
Solution:
- The simplest solution is to avoid the laptop's headphone output and use an external USB sound card.
You can buy an external USB sound card for little money.
- The more complicated variant is to change a few values in the registry editor under Windows.
On the www.liveSHOWsoftware homepage there is a link with instructions
under the menu item 'FAQ questions' and there under 'Sound problems
under Windows'.
This is workable, but a bit complicated and should only be done if you have some experience with the registry editor.