The editing of objects
Special feature when changing volume / brightness / transparency
The alphanumeric editiong of objects
Special Settings
Objects
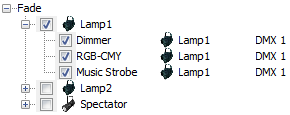
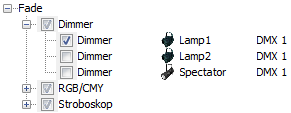
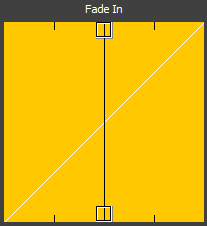
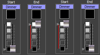
All objects have handles for fade in, fade out, and volume (for sound objects this is the volume, and for dimmed objects, the dimmer channel is affected, the transparency is set for media objects).
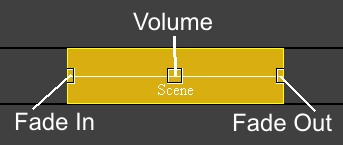 These handles can be moved with the left mouse.
A double-click resets it to its default position.
The handles snap to object borders of other objects!
Note: If several objects are selected in the Timeline, changes to the volume handle affect all selected objects of the same type (sound, light, or media objects).
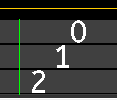
In addition, the objects are divided into invisible areas, which are important for their editing:
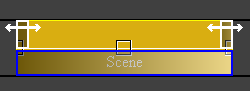 The white-rimmed surfaces serve to lengthen or shorten the objects
If you are in the mouse universal mode ( In the Timeline upper left)
The blue bordered area serves to mark an object - see Selecting objects.
The area between the white surfaces serves to set the PlayCursor.
When you move the mouse over the areas, the mouse cursor changes accordingly.
Note: A double-click on an object opens the object settings. All object properties can be set there alphanumerically.
Scene transitions
Scenes transitions across all the tracks and are displayed transparently.
Scene transitions have the same invisible areas as objects:
If the volume of a sound object is changed, the volume of all other selected sound objects also changes.
If the brightness of a light object (DMX object) is changed, the brightness of all other selected light objects also changes.
If the transparency of a media object is changed, the transparency of all other selected media objects also changes.
This applies accordingly to scene bridges.
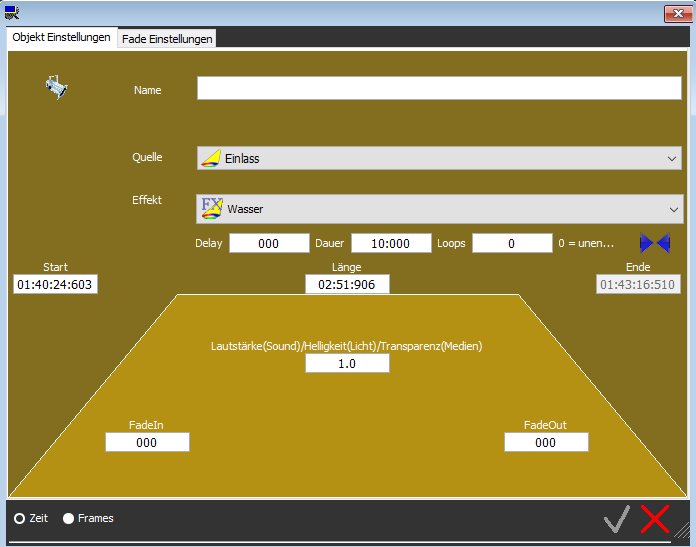
Here you can give the object a name, change FadeIn and FadeOut times numerically, etc.
The adjustable properties depend on the respective object type.
Special feature when changing volume / brightness / transparency
The alphanumeric editiong of objects
Special Settings
Objects
All objects have handles for fade in, fade out, and volume (for sound objects this is the volume, and for dimmed objects, the dimmer channel is affected, the transparency is set for media objects).
These handles can be moved with the left mouse.A double-click resets it to its default position.
The handles snap to object borders of other objects!
Note: If several objects are selected in the Timeline, changes to the volume handle affect all selected objects of the same type (sound, light, or media objects).
In addition, the objects are divided into invisible areas, which are important for their editing:
The white-rimmed surfaces serve to lengthen or shorten the objectsIf you are in the mouse universal mode (
In the Timeline upper left)The blue bordered area serves to mark an object - see Selecting objects.
The area between the white surfaces serves to set the PlayCursor.
When you move the mouse over the areas, the mouse cursor changes accordingly.
Note: A double-click on an object opens the object settings. All object properties can be set there alphanumerically.
Scene transitions
Scenes transitions across all the tracks and are displayed transparently.
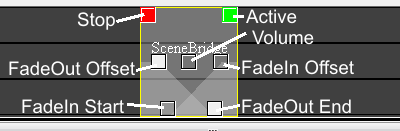
 Stop Stop |
filled: The PlayCursor will stop when it reaches the scene transition NOT filled The PlayCursor will go into the scene transition |
 Active Active |
filled: Scene transition is active NOT filled: The PlayCursor will jump to the next scene transition and skip the deactivated scene transition. |
 FadeOut Offset und End FadeOut Offset und End |
Determine the beginning and the length of the FadeOut operation |
 FadeIn-Offset und -Start FadeIn-Offset und -Start |
Determine the beginning and the length of the FadeIn operation |
Scene transitions have the same invisible areas as objects:
|
In the upper half of a scene transition, the white bordered areas serve to lengthen or shorten the scene transition. The remaining area is used to set the PlayCursor or to mark the scene transition, depending on the mouse mode - see Selecting objects. |
Special feature when changing volume / brightness / transparency
If the volume/brightness/transparency of an object is changed, this is also changed for all other selected objects of the same type (sound/light/media) in the Timeline!If the volume of a sound object is changed, the volume of all other selected sound objects also changes.
If the brightness of a light object (DMX object) is changed, the brightness of all other selected light objects also changes.
If the transparency of a media object is changed, the transparency of all other selected media objects also changes.
This applies accordingly to scene bridges.
The alphanumeric editing of objects
When you double-click on an object, a window opens with the object properties. This also applies to the scene transitions.Here you can give the object a name, change FadeIn and FadeOut times numerically, etc.
The adjustable properties depend on the respective object type.
- In the case of lighting objects, you can also change the source (light ambience) used here.
In a light object or light scene transition, e.g. you can determine how the individual DMX channels should behave while Fade in/out.
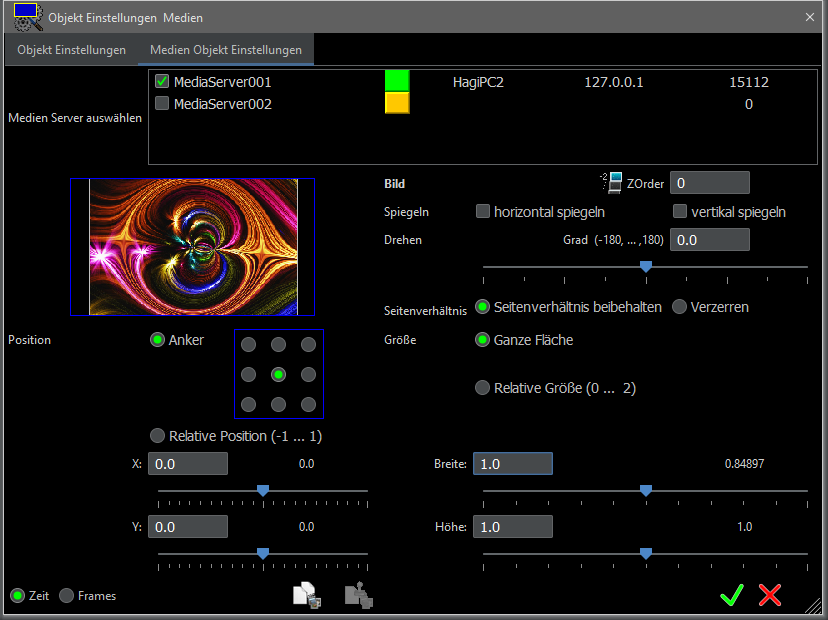
In addition, a DMX effect can be set. - In the case of media objects, it is possible to determine on which media server the media object should be reproduced and the position and size can be specified.
Settings Sound, light or media objects
Settings sound or light or media scenes transitions
Settings sound or light or media scenes transitions
Object Properties
Depending
on the object type (sound, light, media object, sound, light or media
scene transition), you can make various settings:
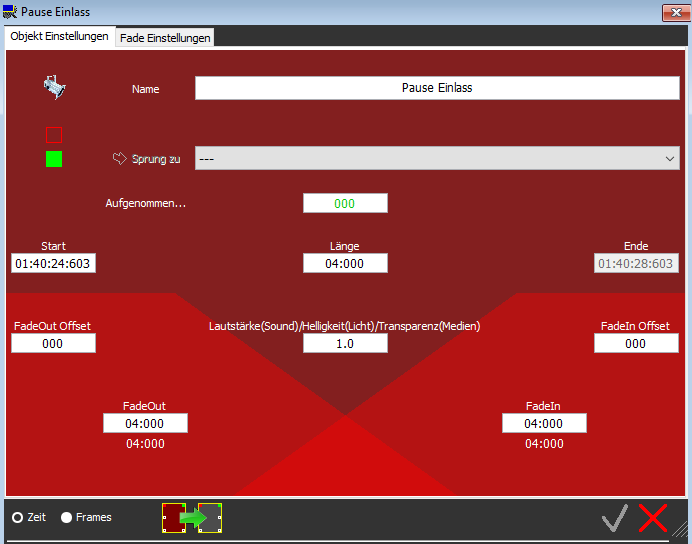
| Name | Here you can name the object. For main scene transitions, the name is set for all three (light, sound, and media) transitions. Caution: For scene transitions the character # is a special character: If the name of a scene transition starts with #, this scene transition is not read out in the remote control - see Remote settings! |
 (only scene transitions) |
By clicking, the stop property of the scene transition can be changed here. If the box is filled in red, the play cursor will stop before the scene transition. If the box is not filled, the play cursor will not stop and enter into the scene transition. |
 (only scene transitions) |
Click to set whether the scene transition is active or not. If the box is filled in green, the scene transition is active and is played. If the box is not filled, the scene transition is skipped and the next active scene transition is played. |
 Jump to Jump to(only scene transitions) |
For
a scene transition, a jump destination (another scene transition) can
be set in the adjacent selection list, which is started when the
PlayCursor reaches the scene transition. Loops or other sequences are possible. If the arrow is filled green, the jump is activated, if the arrow is empty, the jump is deactivated. By clicking the arrow, this can be changed. If no jump destination is selected, the jump is always deactivated. In main scene transitions: This jump must be entered separately for the sound, light AND media transition. |
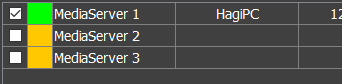
| Source (not at scene transitions) |
For sound and media objects (movie)

|
| Jingle (only for light objects) |
A DMX/light object in the timeline can be marked as a jingle. The object will then behave like a DMX jingle - see Jingle. These objects are given a colored frame in the timeline 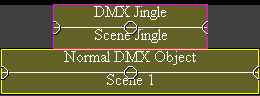 |
| Effect (only for light objects) |
If DMX effects have been defined, a DMX effect can be selected here. The duration of an effect run and the repetitions (loops) can be set. |
| Recorded Time | Here, the recorded time can be changed, see Play control. When playing a show, the time between two scene transitions can be stopped, so when the next scene transition was started. This stopped time is displayed here. If no time has been stopped, '000' is displayed here. |
| Start | The start time (position) in the timeline of the object can be set. With objects from the jingle window this leads to a delay of the jingle. For main scene transitions, the start time is set for all three (light, sound, and media) transitions. |
| Length |
The length of the object can be entered here For main scene transitions, the length is set for all three (light, sound, and media) transitions. |
| Ende | This is the end time of the object in the timeline |
| StartOffset (only Sound/MediaObjects) |
For sound and media objects, the start time of the area within the sound / media file can be specified here. |
| EndOffset (only Sound/MediaObjects) |
For sound and media objects, the remaining time to the end of the file is here. (FileLengthTotal - StartOffset - (Object) Length) |
| Volume / Brightness / Transparency | For sound objects, the volume can be changed here. (Value range 0 .. 2, 0 = silence, 1.0 = original volume, 2.0 = double volume) In the case of lighting objects, the brightness can be changed here, provided the lamps used have a dimmer channel. In the case of media objects, the transparency is changed here. (The meaningful value range is here (0 .. 1) This change will be applied to all other selected objects of the same type (sound/light/media) in the Timeline! |
| FadeOut Offset (nur bei Szenenübergängen) |
Here, you can set when the fade out begins |
| FadeIn Offset (nur bei Szenenübergängen) |
Here, you can set when the fade out ends |
| FadeIn | Here the length of the complete fade in can be changed. Below, the effective fade time is displayed (complete fade time - FadeOffset) |
| FadeOut | Here the length of the complete fade out can be changed. Below, the effective fade time is displayed (complete fade process - FadeOffset) |
Tip: In order to get to know the meanings of the fade times better, you can leave the object setting window open and change the object in the Timeline using the handles!
Reminder: Main scene transitions are coupled sound and light scene transitions, together they have the name, start time and length!
All other values must and can be set separately for main sound, light and media scenes!
 |
Here you can set the unit in which the times are specified. Time: Time in minutes: Seconds: Milliseconds Frames: Sound is sampled at a certain sampling rate. For CD quality, this corresponds to 44100 samples (frames) / second. This resolution is used throughout the project. (44100 frames = 1 second) In later versions of the program, you may be able to change the samplers of the sound, so the frame will change accordingly. |
 (only main scene transitions) |
If the selected object is a main scene transition, you can convert it to several normal scene transitions! The scene transitions inherit the properties from the main scene transition. The current and unsaved changes are now discarded. As a reminder, a main scene transition is the coupling of several scene transitions (light, sound and media). |
 |
Saves the change to the object. |
 |
Discards the changes. |
 |
Change the window size |
Special settings
Sound Lines for Soundobjects
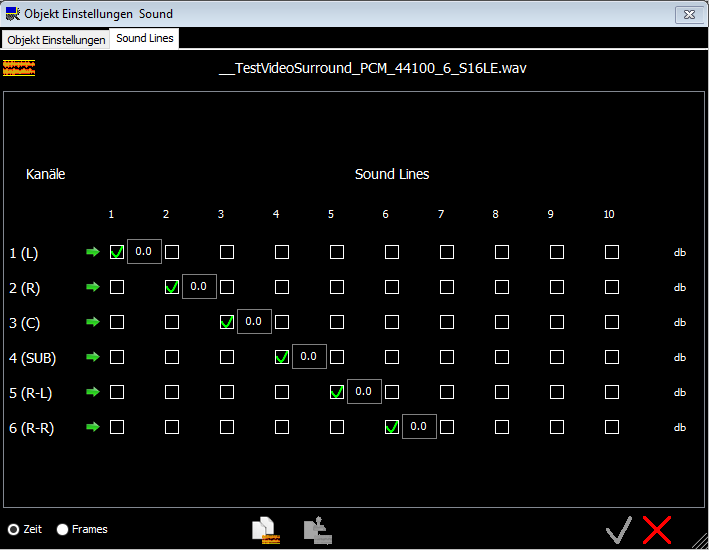
Internally the liveSHOWsoftware uses 10 sound lines - see also Sound Lines.
One or more sound lines can be assigned to each channel of a sound object. In the sound card settings, each channel of a sound card can be assigned which sound lines it should play. So in principle a sound object can be distributed to different sound cards.
By default, the channels of a sound object are assigned to Sound Lines in order:
Stereo:
Channel 1 (Left) -> Sound Line 1
Channel 2 (Right) -> Sound Line 2
Multi-channel sound: like stereo plus:
Channel 3 (Center) -> Sound Line 3
Channel 4 (Subwoofer) -> Sound Line 4
etc.
In addition, the volume can be decreased or increased for each assignment (in decibels db):
0 db = no change in volume
-3 db = half intensity of the sound (rule of thumb)
+3 db = double intensity of the sound (rule of thumb)
If you use only stereo sound files and a stereo sound card, you don't have to change anything here. But you can also adjust the assignment of the sound lines to your needs.
Note: Theoretically it is possible to reduce a 5.1 surround sound to a stereo signal by assigning all left channels to sound line 1, all right channels to sound line 2 and the 'center' channel to both sound lines. Here, however, the volumes of the individual channels must be reduced. Some 5.1 surround sound files have a time delay (phase shift) between the front and the rear channels, this can lead to artifacts. Better try to convert the multichannel sound to a stereo signal with the Video/Sound Converter.
 |
To transfer the sound lines settings of the sound object to other sound objects, click on this symbol . The parameters are copied to a clipboard. To assign them to another sound object, open the settings window of the relevant sound object and click on  . .All sound lines settings are overwritten, the standard parameters (length, fade times,...) are not affected. |
|
The sound lines settings are overwritten with the values from the clipboard. To accept these values you have to click on |
|
Saves the changes to the object. |
|
Discards the changes. |
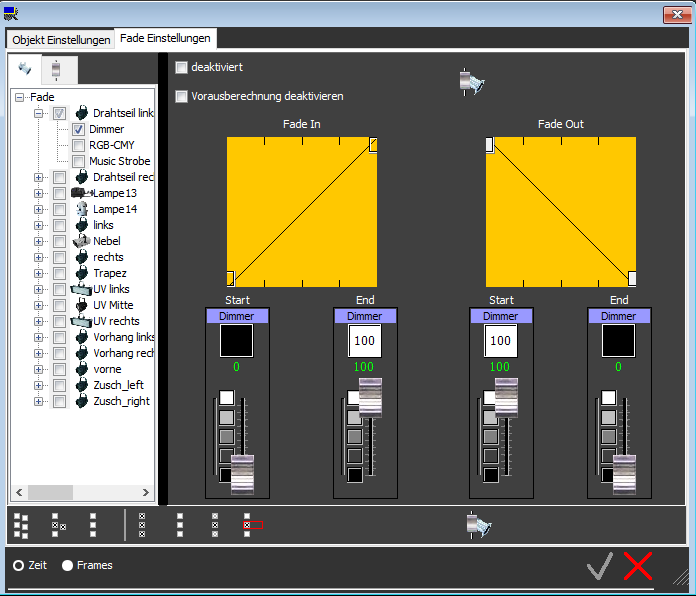
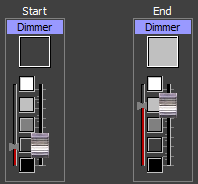
Fade behavior with light objects
(This is not available for sound or media objects)


 .
.

 .
.