3.) The number of channels nnd the assignment of sound lines
You can determine how many channels the output file should have, i.e.
whether it should be a mono sound, stereo sound or a multi-channel
sound.
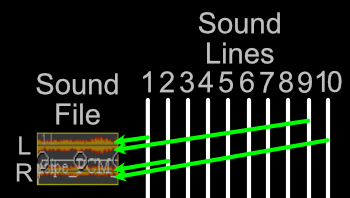
Here the
sound lines are important.
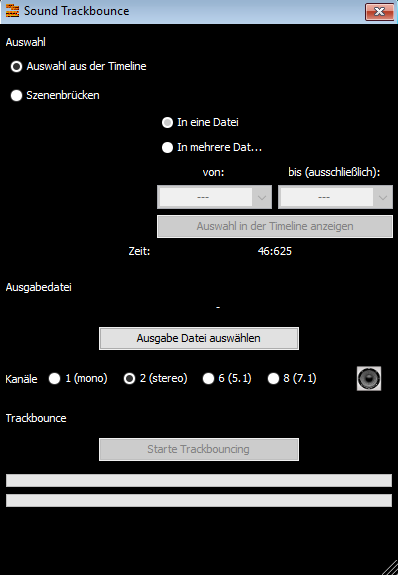
First you specify how many channels the output should consist of:

If you click on the icon

, you can specify which
sound line should be written to which channel of the output.
If you want to create a stereo file, have only used stereo files and
have not changed anything in the Sound Lines settings of the sound
objects, you do not have to enter anything here,
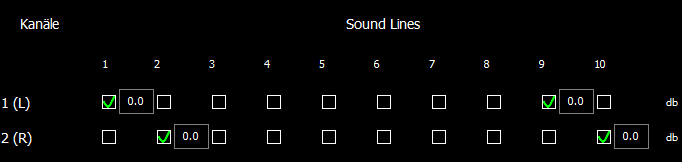
If you have changed the sound lines settings in the sound objects or
used multi-channel sound files, you must specify which sound lines are
to be used for which output channel.
Example of a special use case - pseudo surround sound:
An airplane is supposed to fly from front to back. Let's assume you have an airplane sound as a stereo file.
In the timeline, you create two sound
objects from the airplane sound. You arrange the two sound objects
offset with a crossfade.
Set the left channel of the first sound object to Sound Line 1 and the right channel to Sound Line 2.
Set the left channel of the second sound object to Sound Line 5 and the right channel to Sound Line 6.
For track bouncing, specify 6 channels (5.1) and open the Sound Lines setting .
Assign Sound Line 1 to channel 1 (front left) of the output and Sound Line 2 to channel 2 (front right).
To channel 3 (center) of the output, assign Sound Line 1 and Sound Line 2 and decrease the volume by 3 db (-3 db) each.
To channel 5 (Rear Right) of the output, assign Sound Line 5 and to channel 6 (Rear Right), assign Sound Line 6.
Since there are no extra low frequencies, channel 4 (Subwoofer) in the output remains empty.