Here a sound file can be loaded. A range or all the sound data can be dragged into the timeline or the jingle window.
The basic idea
Buttons
Marker
Set a selection range
Move sound data in the timeline or jingle window
The basic idea
- A sound file is loaded to integrate sound.
- Only
when sound data from this window are dragged into the timeline or the
jingle window will a sound object be created and fade parameters can be
set. If the sound data in the timeline, this window can be closed.
- Here, you can set cutting marks and define a range. A range can be dragged into the Timeline or the Jingle window.
- The sound files are left in the original location in your file system. The program remembers these places.
- To port an entire project to another computer, you can use the export function (Menu: Project - Export Project). This will copy all necessary sound files into the project folder.
- To conserve resources and jump directly to specific locations, all sound files must be converted to wav format. The program usually does this automatically.
ATTENTION:
Sound files of other formats have to be converted into wav format.
Please refer to help programs (for example, Audacity). The default setting is: 44100Hz, stereo, 16bit, little endian
The technology
The Progeramm does not load the entire sound file into the working memory, but always bufferes only small sections (120 ms). In order to use this resource-saving technique, all files must be converted to the wav format. The data is converted to CD quality (44100Hz, 2 channels, signed 16bit, little endian) as standard.
The wav file ends up in the same folder as the original file. For
the graphical representation, the sound file is analyzed and the data
are stored in the same folder in a .lsg file with the same name as the
wav file. If
markers are set, their data is stored in an lsm file. If a very large
sound file is loaded, the calculation of the graphic data may take some
time.
During the calculation of the graphic data, the icon  is displayed.
Note:
If you want to copy a sound file (e.g. xxx.wav) or move it to another
folder, you should copy the lsg and especially the lsm file (in the
example xxx.lsg and xxx.lsm) as well. Then the graphic data do not have
to be recalculated and you preserve your markers.
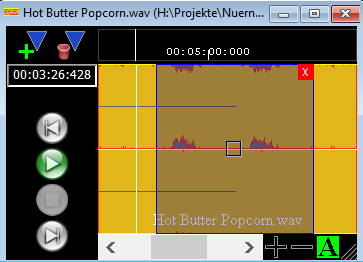
The playback
The time display shows the position of the play cursor.
 |
Plays the sound file from the play cursor position. |
 |
Playback pauses, the playcursor stops |
 |
The play stops, the play cursor jumps back to the beginning |
 |
The play cursor jumps to the beginning |
 |
The play cursor jumps to the end |
The scroll bar:

 |
The view is widened horizontally (zoomed)
You can also zoom with the mouse wheel. |
 |
The view is reduced horizontally
You can also zoom with the mouse wheel. |
 |
By clicking on , you can switch the automatic tracking of a PlayCursor on and off.
The picture shows the current state:
 Tracking is disabled Tracking is disabled
Tracking is enabled
 By
moving the scroll bar, you have moved the visible area so far that the
PlayCursor is no longer visible - tracking is temporarily switched off. By
moving the scroll bar, you have moved the visible area so far that the
PlayCursor is no longer visible - tracking is temporarily switched off.
Click on A to recapture the PlayCursor. |
 |
change the window size |
The Time bar:

Times are displayed here. You can set the playcursor and add markers to the playcursor position.
Marker
Markers mark a specific position in a sound file. Selection ranges snap to markers.
Markers help to cut a sound file. It makes sense to remember certain intersections with the help of markers.
Markers are automatically saved in a xxx.lsm file by closing the SoundFile view.
 |
Adds a new marker to the Playcursor position |
 |
Deletes a selected marker. |
Markers can be selected by simple clicking, they are then displayed in blue.
Double-clicking on a marker opens a setting window:
Marker-setting window:
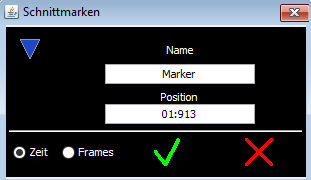
Here you can change the name of the marker and its position.
Time: indicates position in minutes, seconds and milliseconds
Frames: specifies the position in frames.
This is based on the sound sampling rate.
At a sampling rate of 44100Hz, one frame corresponds to a time of 1/44100 seconds
Set a selection range
When you move the mouse in the view window while holding down the left button, you can specify a range.
The range is displayed in transparent blue color.
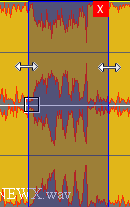
On the left and right margins, you can zoom in and out the range with the left mouse button.
If you have defined markers, the range limits snap to the marker positions.
 Closes the range.
Move the sound data into the Timeline or the Jingle window
If you hold down the left mouse button within a range, you can drag the range into the timeline or jingle window.
If
you hold the left mouse button outside of a range, you can drag the
entire sound file into the timeline or the jingle window.
Note: The range is automatically set to the complete length.
 Sound) -> (
  Load Sound File)
 )
) )
)