Tutorial DMX Light
The DMX hardware set-up
 Warning: The live SHOW software is designed to control theater lights.
The
use of safety-critical DMX devices (such as flame throwers,
pyrotechnics or similar) is your own responsibility, and the author
assumes no liability for the use of safety-critical devices.
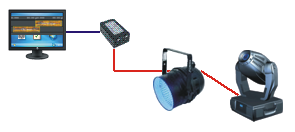
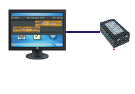
- A computer on which the LiveShow software is installed.
- A hardware interface that can be connected to the computer with a USB cable or LAN cable (blue line) and can send DMX signals.
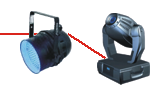
- DMX devices that can process DMX signals and are connected to the HardwareInterface via a DMX cable (red line).
The first lamp
is connected to the hardware interface with a DMX cable, a second DMX
cable connects the first lamp to the second lamp, a third cable connects
the second lamp to the third lamp, etc.
The principle:
- The LiveShow software on the computer sends commands to the HardwareInterface.
- The commands are converted into DMX signals by the hardware interface and sent to the devices via the connected DMX cable.
- Each device looks for its DMX signals and thereby changes its characteristics (brightness, color, position, ..) ..
How DMX works:
A DMX cable is used to route 512 values in a row. The individual values have a range from 0 to 255.
Each device has a so-called start address, which can be set directly on the device. Depending on the
number of characteristics of a device (brightness, color, ...), the device
requires a certain number of values (channels) to set all properties.
On the basis of
its starting address, a lamp from the series of 512 values picks up a
number of values and sets itself accordingly.
A example:
Let's say we have a device that can change its brightness and mix a color of red, green and blue. This device requires 4 values. The first value
is for the brightness, the second value for the red part, the third
value for the green part, and the fourth value for the blue part of the
color. Furthermore, we assume that a starting value of 5 has been set on the device.
Thus the lamp from the row of the 512 DMX values will take the 5th, 6th, 7th.and 8th value and change their properties accordingly:
| Device |
- |
- |
- |
- |
Brightness |
Red |
Green |
Blue |
- |
- |
- |
| DMX Values |
1. |
2. |
3. |
4. |
5. |
6. |
7. |
8. |
9. |
10. |
etc. |
| 100 |
150 |
200 |
0 |
255 |
255 |
0 |
0 |
100 |
20 |
... |
The individual
values can cover the range from 0-255, so in the example the device will
have the maximum brightness and shine in red.
Attention: The next device can only start at the DMX start address 9, otherwise a conflict of values would occur.
In principle,
the next possible start address can be calculated as follows: previous
start address + number of required DMX channels of the preceding device
The DMX addresses start at 1.
For the last lamp: the start address + the number of DMX channels required must not exceed 512!
Since a value of 0 to 255 can go, it is clear that the subdivisions for a property of a lamp 256 (values 0-255) are possible.
But what if a property should be finer divided, the horizontal angle setting (Pan) for scanners or movingheads for excample.
In this case, the device manufacturer has used two DMX channels for this property. The device therefore searches for a property two values out of the row of 512 DMX values, thus 65536 subdivisions are possible.
For simplicity
it can be said that the value makes the rough setting (high value, high
byte, MSB) and the other value the fine setting (low value, low byte,
LSB).
What if the sum of the devices and their properties exceeds 512 DMX values?
In this case,
several hardware interfaces must be connected to the PC and several DMX
cable strings must be pulled accordingly. There are also
hardware interfaces that have implemented several DMX outputs and thus
can be connected to one interface several DMX cable strings.
Terms from the DMX world
- DMX universe
A series of devices that are connected to one DMX cable string are called DMX Universe.
For one show, several DMX universes could be used, e.g. 512 DMX values are not sufficient or the local conditions require that several cable strings have to be laid.
With several DMX universes you also need several DMX hardware interfaces.
- DMX start address of a device
As explained
above, this is set on the device itself and indicates the position from the
series of sent 512 DMX values, the device will pick up its values.
- Hardware Interface
A hardware
interface is a device that communicates with a computer via a USB or LAN
cable and sends DMX signals to the lamps (devices) via a DMX cable.
The LiveShow software transmits control signals to the hardware interface, which are converted into DMX signals there. The DMX signals are sent to the lamps/devices via the connected DMX cable (DMXUniversum).
The technical design of a DMX stage
| The LiveShow software is installed on the computer |
Rechner |
A DMX hardware interface is connected to the computer.
For USB interfaces: The drivers for the DMXHardwareInterface must be installed! |
DMX Hardware Interface
 |
| From the DMXHardwareInterface, a cable leads to the DMX input of the first lamp (DMX device). |
DMX Universe
 |
| From the DMX output of the first lamp, another cable is fed to the DMX input of the second lamp. |
| From the DMX output of the second lamp, another cable is fed to the DMX input of the third lamp. |
etc.
Note: The connection sequence of the lamps does not have to be in the order of the set start addresses. |
The DMX start address must be set for each lamp.
The DMX mode must be activated for each lamp.
- See instruction manual of the DMX device - |
|
Settings in the liveShow software
In the LiveShow program, the technical structure of your stage is now reproduced.
Set and store light ambiences
Step 3 Set Light ambiences;
If you select a lamp in the DMX stage view, you can adjust the lamp characteristics in the lamp mixer.
If in the last steps everything has been reproduced correctly, the real lamp should now also react.
Troubleshooting:
If the real lamp does not react, check the following points:
- Are all DMX cables connected correctly?
- Are all DMX cables technically correct?
- Are the correct DMX modes set for all devices?
- Are the correct DMX start addresses set for all devices (without devices overlapping)?
If each lamp has
a start address that starts after the previous start address plus the
number of DMX channels required for the previous device!
- Is the DMX hardware interface properly connected to the computer (USB, LAN cable is correct)?
- Has the software connected to the DMXHardwareInterface (driver installed, the settings of the HardwareInterface are correct)?
- Is in the software the DMXUniversum connected to the HardwareInterface?
- Are the DMXUniversen and start addresses of the devices set in the software?
- Does the device type in the software match the real device?
Schritt 4 Save light ambiences:
If you have made
the desired settings in the DMX stage view for all devices, you can save
the setting of all devices as light ambience in the DMX Light ambiences.
menu: ( DMX-Light) -> (
 DMX Light ambiences)
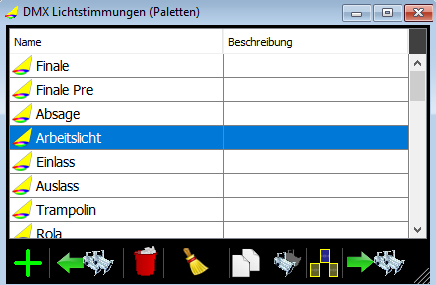
Just click on  ,
it will create a new light ambience, the newly created light ambience
already contains all the settings of all lamps.
,
it will create a new light ambience, the newly created light ambience
already contains all the settings of all lamps.
If you want to change a light ambience, click on the light ambience
to select it and then on  . The selected light ambience
is then overwritten with the current lamp values of the stage view.
. The selected light ambience
is then overwritten with the current lamp values of the stage view.
If you want to
control a light ambience, click on the light ambience to select it and then on , the stored lamp values will be sent to the lights.
Schritt 5 Drag a light ambience into the Timeline
To select a light ambience, click on a light ambience.
Click on the
selected light ambience, hold down the left mouse button, and drag the
light ambience to one of the light tracks in the timeline.
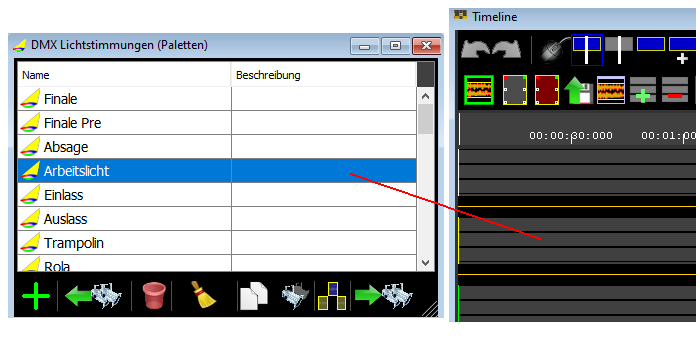
A light / DMX object is now created in the Timeline. 
The light / DMX object has three small squares, handles. When you click on a handle with the left mouse button and hold down the mouse button, you can move the handles.
The
left handle determines the fade in behavior, the right handle
determines the fade out behavior, and the middle handle determines the brightness (dimmer channel) of the light.
If you
double-click on an object, the object settings for this object open,
here you can enter the fade behavior and the brightness numerically and also add a DMX Effect.
Schritt 6 Arrange light objects in the timeline and insert scene transitions:
In Timeline, you can arrange the light objects and insert scene transitions.
menu: ( Windows) -> (
 Timeline)
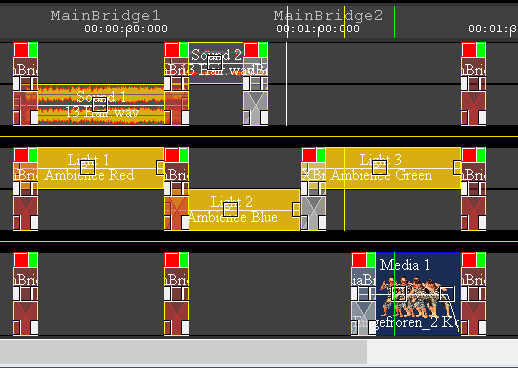
The objects can be moved in the timeline, the objects must be selected for this purpose.
To select an object, click in the lower half of an object, a selected object gets a blue background - see Timeline.
Note: Unmarked objects can not be moved, which is a safety measure to prevent accidental movement.
Note: The use of the lamps is calculated in advance by the
liveSHOWsoftware. All properties of lamps are always set in advance as
they will be needed the next time the lamp is onNote: The usage of
lamps is calculated in advance by the liveSHOWsoftware. All properties
of lamps are always set in advance as they will be needed the next time
the lamp is on - see Timeline precalculation.
Step 7 save Project:
Under the menu: ( Project) -> (
 save Project under) you can save a project.
The software saves the project data in several files, so you should create an extra folder for each project !!
When you exit the software, you are always asked if the current project should be saved.
Conversely, you can also open a saved project again: menu ( Project) -> ( load Project)
Step 8 Play project / show:
To play a project, you have the following options:
- Scenbook
menu: ( Windows) -> ( Scenebook)
- Play Control
menu: ( Windows) -> ( Play Control)
The remote control can also be adjusted via a wireless mouse.
- Remote remote control via Android device
menu: ( Settings) -> (
 RemoteSettings)
- Timeline
menu: ( Windows) -> ( Timeline)
If necessary, step 9 export Project
( Project) -> ( export Project)
The software leaves all sound files and media files when saving a project at its original positions. To export a project to another computer, you should export the project.
When exporting, all sound files and media files are copied to the export folder. You can open an exported project as normal as a saved project.
Exported projects and stored projects differ only in that the sound / media files are copied during an export.
Another difference when exporting is that you have the possibility to save only part of a project.
This allows you to export certain scenarios, such as a thunderstorm, and import them back into other projects ( Project) -> ( import Project).
Note: When exporting the DMX devices / devices and DMX Universes are exported with. These are loaded with the import when the same device, the same universe, is not already present.
Imported devices or universes are displayed with a '*' in the name.
Tip:
Operation
A click with the right mouse button on an object, button, .. shows the tooltip.
A double-click on an object, device, ... opens a properties window.
A click with the left mouse button and pressing the Ctrl or Shift key allows a multiple selection.
Tip:
Further help
There are additional help pages in the menu. (

Help).
Among other
things, you will find the point 'Show help for the current window', here
the help content changes automatically when a window of the software
receives the focus.
Tip: Create default project
If you have a fixed set-up, say you have always or mostly the same devices, so the following approach for shows:
Create
an empty project that contains all your DMX hardware, DMX extensions,
and devices, save it under a project name (e.g., 'MyProject').
If you are
planning a new show, first load your empty project ('MyProject'), then create all
necessary scenes etc. for the new show and save the project under a new
folder and name.
Background:
The program checks all objects for equality by comparing an internally assigned ID (this is never seen). This ID is
always created when a new object is added (for example a spotlight is
added to the stage view, a new DMXUniversum is added, etc). The name of the objects is irrelevant for the equality test!
The ID is also saved when a project is saved or parts of it are exported.
When you import a
project (or the part of a project), all objects of the imported project
that do not have the same ID in the existing project are recreated -
even if the names should be the same! This means that e.g. can be duplicated.
Tip: Export frequently used scenario combinations
If you take the
"Create a standard project" tip, you can export combinations of sound
and / or light scenes (for example, thunderstorms, evening mood, final
etc.) from already created projects and import them into new projects.
In other words, you can export parts of a project and then import them into other projects.

 .
.

 Import device type).