Tutorial Media (Texts, Pictures, Movies)
Media can currently consist of text, images or videos.
To ensure that
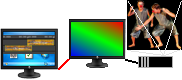
the actual LiveShow computer is not loaded with the rendering of videos,
the presentation of the media can be transferred to a second computer. The liveShow computer (Timeline) controls the playback of media on another computer. The two computers must be connected to each other via a computer network (LAN / WLAN).
However, you
can run both the LiveShow program and playback of media contents on the
same computer, the computer must be powerful enough.
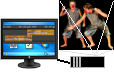
The
computer that plays the media needs an extra software, the
LiveShow_Media software (as I said, the LiveShow_Media software can
also run on the LiveShow computer).
The LiveShow software is connected to the LiveShow_Media sofware (see below) and controls the playback remotely. The LiveShow_Media software plays the media. The media files are automatically transferred once from the LiveShow software to the LiveShow_Media software.
Each media object in the Timeline can be assigned a MediaServer that displays this media object (Double-click on the media object).
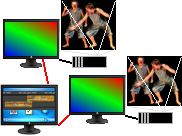
With this
technique, it is also possible to connect several computers
(LiveShow_Media software) to the LiveShow software, which makes it
possible to play several playback locations at the same time, on which
different media objects are reproduced.
You need:
- A computer on which the LiveShow software is installed.
- One or more computers on which the LiveShow_Media software is installed.
Alternatively, the LiveShow_Media software can also be run on the same computer as the LiveShow software, the computer must then be powerful enough - see notes on playing videos.
- The computers must be connected to each other via a computer network (LAN or WLAN)
The principle:
- Media files (text / image / video) or areas from it are added to the timeline, resulting in media objects.
A media server can be assigned to each media object.
- The media files of the media objects are transferred to the corresponding LiveShow_MediaServer computer.
- When playing the Timeline, the media is played back by the LiveShow_MediaServer software.
The Timeline controls the LiveShow_MediaServer software.
- The texts / pictures / videos can be projected via a video projector or displayed on extra monitors.
Connect computers to the network
Step 1 Connect computers to the network
Before you can
start the media, first the network connection (LAN, WLAN) must be
established between the LiveShow computer and the LiveShow_MediaServer
computer.
NOTE: Please note that you do not use local devices such as Internetrouters etc. for the network connection. These devices are no longer available at your show location, so your network connection may no longer work.
Use instead mobile hardware accesspoints or lan cables.
If you want to
run MediaShow (LiveShow_MediaServer) and the LiveShow software on the
same computer, you do not have to set up a network, the loopback
interface is used.
The liveShow software automatically finds the MediaServer, if the computers are connected by network.
Settings on the playback computer (LiveShow_Media Software)
The LiveShow_Media software must be installed on the computer to play media. The software can be downloaded from the page www.liveSHOWsoftware.de under 'Downloads'.
Step 2 Start and configure LiveShow_Media
Start the liveSHOW_Media software on your computer.
When you first
start up, you will see a configuration window where you can make all
settings such as network connection and projection screen.
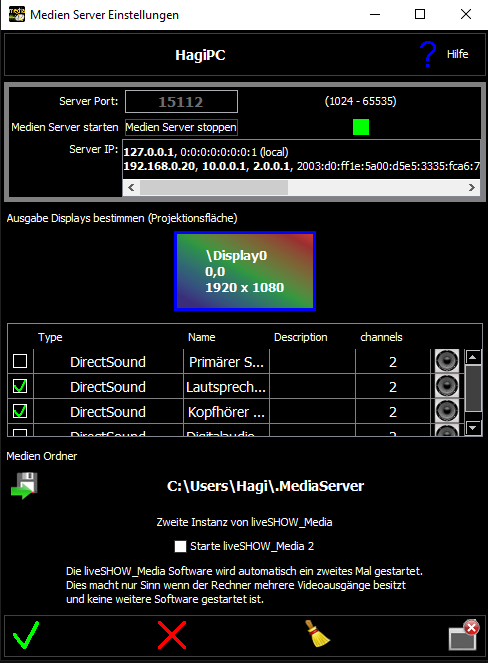
The configuration window has a help button on the upper right, which can be used to access configuration help.
a) If you have connected a second monitor or video monitor, you will see two rectangles (display) in the center. For this purpose, the display property must be set to 'several monitors' in the operating system.
By clicking on one of the rectangles, you can select the monitor via which the media projection is to be displayed.
b) Click on 'Start Media Server' to start the projection and the software waits for signals from the Timeline.
Note: The LiveShow_MediaServer can be started several times on the same computer - see Start several MediaServer on the same computer.
This makes sense for computers that have multiple graphics outputs, which in turn are controlled separately. The prerequisite is, of course, that the computer hardware can play several video files paralell.
Media (liveShow Software)
Step 3 Manage MediaServer in the LiveShow software
menu ( Media) -> (
  Media Server)
This opens a
Media Server window, where you can add media servers and connect the
liveShow program to a LiveShow_Media program.
The MediaServer (liveSHOW_Media) is automatically found and
listed in the 'Found' column if the computers are connected to the
network.
To connect to a MediaServer, click the orange box in the 'Connect' column.
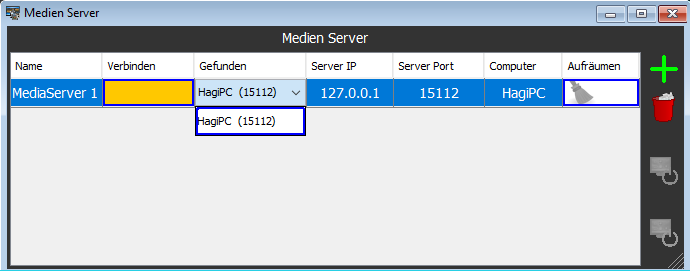
You can then specify in the Timeline the media server on which a media object is to be played - see below.
Schritt 4 load media file
menu ( Media) -> (  load media file)
Here you can load texts, pictures or videos.
Textformats: RTF or HTML, only plain text (no images, hyperlinks etc.) may be used.
Image formats: JPG, PNG, GIF
Video formats: almost all standard video formats
Note on video files: On low performance computers no 4K (3840 x 2160) .video will run without
hanging!!! Ideally, the image size should be HD (1920 x 1080) or
smaller.
The liveSHOWsoftware tries to analyze the loaded video and reports a
warning if the loading of frames or the jumping to a certain position
should be too slow.
If a video is used on the media server (liveSHOW_Media software), the
liveSHOW_Media software sends such warnings to the liveSHOWsoftware.
Such an analysis is difficult to implement and does not always provide
useful results, the warning is only to be considered as a hint,
It should definitely check if the video is running properly.
In the menu: 'Media' - 'Show Videowarnings' the display of video warnings can be switched on and off.
For videos whose resolution (width x height) does not match the
screen/beamer resolution, artifacts may appear (e.g. smooth image edges
are stair-stepped).
This is because the images of the video have to be re-rendered
(redrawn) in a different resolution. Edge smoothing when redrawing the
images is very computationally intensive and is therefore not currently
used in the liveSHOWsoftware.
Note: It can be that a video is
played smoothly by other software (e.g. VLC player), but in the
liveSHOWsoftware the video hangs or jerks.
This is because the
liveSHOWsoftware does not just play the video, but has to overlay and
transform it with other media. Reducing the picture size leads
haüfig to the goal.
To convert a video file you can use the Video/Sound Converter
Tip:
You can also load a sound file instead of a video. The sound will then
be played back later on the computer on which the
liveSHOW_MediaSoftware is running.
NOTE on html files: No HTML files with images, hyperlinks, etc. can be used. You can only use HTML files that contain plain text.
Reason: Images are not stored in HTML within the HTML file. The LiveShow software transfers only the HTML file to the media server, so the images are not transferred!
Note on RTF files: The
dimension of RTF text in a small font size may not be calculated
correctly. RTF texts should be written in a large font size !
If the text is cut off at the edges, it helps to insert spaces at the beginning and end!
CAUTION: You should
always copy media files (texts / pictures / videos) to your hard drive
before you open them, in a folder that has no restricted user rights.
It is not
possible to open media files from a data CD because the program has to
create auxiliary files for the media file and this is not possible on a
CD.
The program leaves the media files at the original position when saving a project. If you have
loaded it from one of a USB stick and the stick no longer exists after
opening a project, the media file will no longer be found!
Note: In principle,
you should make sure that the name is unique, that is, media files are
not only called 'Film1' but have the film title and descriptive
properties in the filename.
Note: File names
should not contain special characters, umlauts, or punctuation marks
(this could lead to problems in the file system of some operating
systems).
After opening the media file, a window will appear Mediaview:
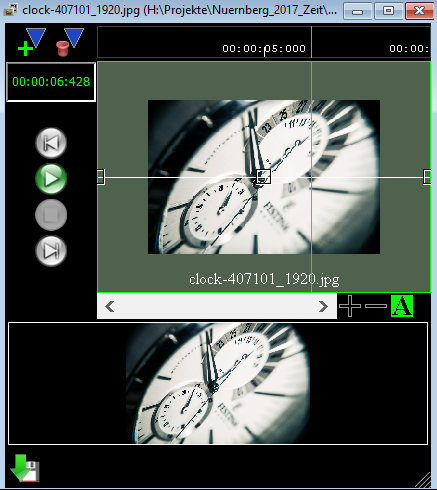
The upper part shows the first, middle and last image of the media file (for an image file, it is only one image).
In the lower part you see a preview. You can preview the video / image, insert the marker, and specify a range - siehe Media View.
To specify a
range within the media, click in the upper part with the left mouse button,
hold down the button, and move the mouse horizontally.
Note Texts or images can be edited at runtime via a corresponding editor of your choice. The LiveShow program automatically detects when media files have changed and accepts the changes. However, make
sure you are actually editing the file that is currently open by the
LiveShow program - when you open or import an exported project, the
media files from the project folder are opened, not the original files (see Im- Export).
You can view the currently used media files in the list of media files - see step 11.
RTF texts can be modified and created under Windows with the Wordpad and under the Mac with the TextEdit. RTF texts can be
changed and created under Windows with the Wordpad and under the Mac
with the TextEdit, HTML texts could be edited under Windows with the NVU
web editor and under the MAC with Amaya, pictures can be edited with
the program Gimp. NVU, Amaya and Gimp you can download free on the Internet.
Step 5 Drag the media file or an area from it into the Timeline
menu: ( Windows) -> (
  Timeline)
To move the
entire media file or a section (area, shown in blue) to the timeline,
click in the upper part of the window or the blue area hold down the mouse button and drag it into a media track of the Timeline
.
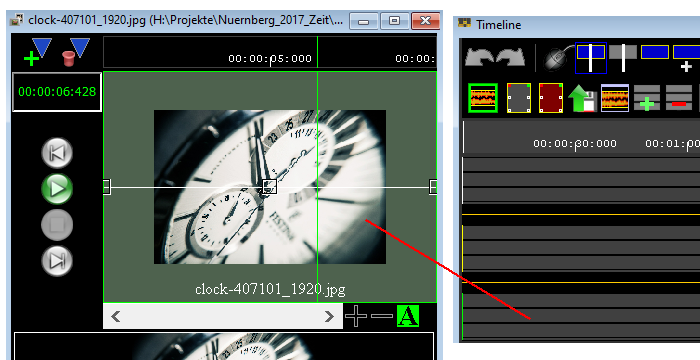
A media object is now being created in Timeline. 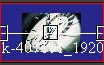
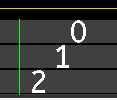
The media object has three small squares, handles. When you click on a handle with the left mouse button and hold down the Ma key, you can move the handles. The
left handle determines the fade in behavior, the right handle
determines the fade out behavior, and the middle handle determines the
transparency (brightness) of the object.
If you
double-click on an object, the object settings for this object open,
here you can enter the fade behavior and the transparency numerically.
Intermediate media objects are also rendered at the same time. The content of the objects in an upper track is displayed in front of the contents of an underlying track.
If
you place an image frame with a transparent surface in the uppermost
track and a film in the second track, the film is visible through the
picture frame.
Internally, media objects
have a Z-order value, similar to graphics programs. The value determines
which image is displayed before another.
As mentioned above, this value is determined by the media track:
Z-Order value of the media tracks
The lower the Z-order value, the more in the foreground the media content is displayed.
With objects in the Timeline this value is automatically determined by the track, with a jingle this value can be set.- see: Jingles.
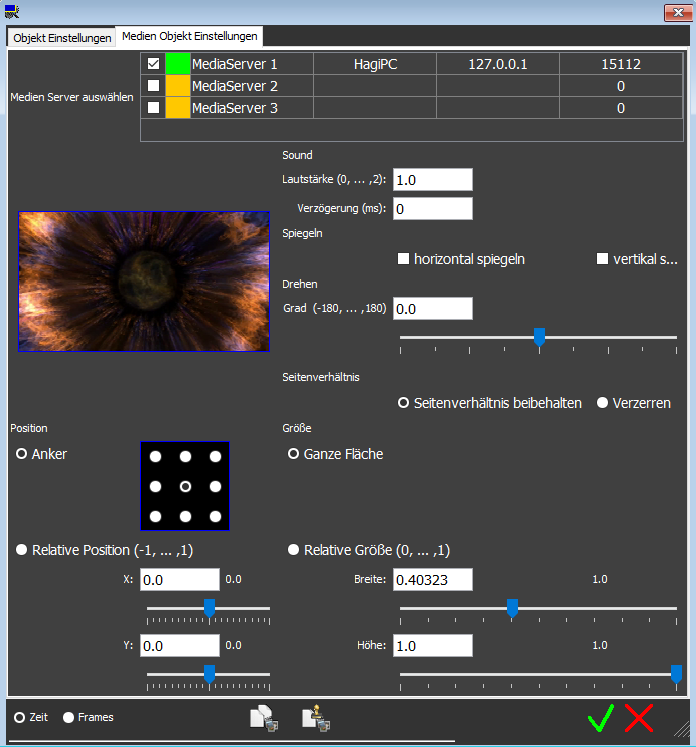
Step 6 Settings of the media object (assignment to one or more media server):
If you double-click on a media object, the object settings for this media object will open.
For this media object, you must specify which media server to play on, before it is visible!
In the settings of the media object, you can define fade in and fade out times. You can also adjust how the media object is displayed on the projection.
Step 7 Arrange media objects in the timeline and insert scene transitions:
In Timeline, you can arrange the media objects and insert scene transitions.
menu: ( Windows) -> ( Timeline)
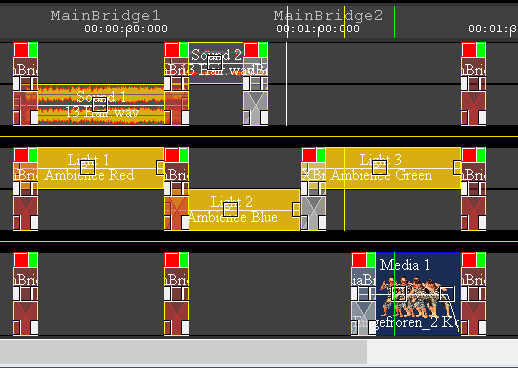
The objects can be moved in the timeline, the objects must be selected for this purpose.
To select an object, click in the lower half of an object, a selected object gets a blue background - see Timeline.
Note: Unmarked objects can not be moved, which is a safety measure to prevent accidental movement.
If you are using movies, please note the notes on playing movies.
Step 8 save Project:
Under the menu: ( Project) -> (
 save Project)you cab save a project.
The software saves the project data in several files, so you should create an extra folder for each project !!
When you exit the software, you are always asked if the current project should be saved.
Conversely, you can also open a saved project again: menu ( Project) -> ( load Project)
Step 9 Play project / show:
To play a project, you have the following options:
- Scenbook
menu: ( Windows) -> ( Scenebook)
- Play Control
menu: ( Windows) -> ( Play Control)
The remote control can also be adjusted via a wireless mouse.
- Remote remote control via Android device
menu: ( Settings) -> (
 RemoteSettings)
- Timeline
menu: ( Windows) -> ( Timeline)
If necessary, step 10 export Project
( Project) -> ( export Project)
The software leaves all sound files and media files when saving a project at its original positions. To export a project to another computer, you should export the project.
When exporting, all sound files and media files are copied to the export folder. You can open an exported project as normal as a saved project.
Exported projects and stored projects differ only in that the sound / media files are copied during an export.
Another difference when exporting is that you have the possibility to save only part of a project.
This allows you to export certain scenarios, such as a thunderstorm, and import them back into other projects ( Project) -> ( import Project).
Eventuell Schritt 11 List of all media files used
( Media) -> ( Medien List)
This opens a window where all the media files used are displayed.

You can print or export (csv) this list, open new media files, show up where a media file is used in the Timeline, etc.
Notes on playing movies
Video files can be in many different (compression) formats. The image size (width / height) of the videos can also be very different.
Depending on the file format and the picture size, the playing of a video can be very intensive. Please always check if your computer can play a video smoothly before using a project in a show.
Tests under Windows:
An Intel i5 Generation 6 or better processor was sufficient for HD movies.
For 4K movies, an Intel i7 Generation 12 or better processor was sufficient.
If your video does not play smoothly, you can try to
convert the video with the Video / Sound Converter in the
liveSHOWsoftware, if necessary reduce the image size.
The liveShow software tries to calculate and adjust the next place in a video (media object). It is, however, impossible to predict all eventualities.
The following points help in the calculation:
- Please avoid loops / jumps within a media object (video) in the timeline.
- Do not start directly with a video in the Timeline, but leave a
little pre-run (at least 10 - 20 seconds) until the first video starts
(during this time the pre-calculations can be made).
- Your video may not need to be played back in a very high resolution if the projector has a smaller resolution.
- Some movies are badly compressed, here it helps to re-render the movie with the video / sound converter in the liveSHOWsoftware.
You must try something in doubt.
Video with sound
Videos with sound often have the problem that the picture and
the sound are decoded only pseudo-simultaneously. The liveSHOWsoftware
tries to compensate this by playing the sound only if the picture fits
to it.
This can cause minimal sound gaps at the start of a video. You can
compensate for this by avoiding hard cuts in the timeline and
overlapping two directly adjacent videos minimally with a croddfade.
Sometimes it can also be because the audio sample rate is not 44100 Hz
or no fixed audio bitrate is set. Then the audio has to be converted on
the fly when playing. Converting the video with the Video/Sound Converter may help here.
Some videos have integrated sound, although the audio data contains
only silence. Here it helps to convert the video without audio data
(channels = 0).
If you use external software to convert a video, it is best to set it to MP4 format.
For audio compression, select a sample rate of 44100Hz and a fixed bitrate (192k).
Videos with transparencies
There are only a few video formats (codecs) that also save the alpha
channel (transparencies) and there are only a few video editing
programs that can output films with transparencies. The free Shotcut
software can output films with transparencies in Quicktime animation
(.mov) format. The liveSHOW software currently supports Quicktime
animations (.mov) with transparency.
With Quicktime animations, the video is not compressed, it always contains full frames, so the files are very large.
Note: The video/sound converter
currently always outputs an mp4 movie, no transparencies are saved
here, so the converter cannot be used for Quicktime animations.
Tip video editing software
There is a free video editing software, which also allows the export of a movie into the Quicktime animation format: Shotcut.org.
The Quicktime animation format allows transparent content within a movie.
Note: Start multiple MediaServer programs on the same computer
Starting
several media servers on the same computer only makes sense if the
computer has several graphic outputs and you assign a different graphic
output (display) to each media server. The computer should also have
enough memory and computing power.
In the MediaServer settings of the liveSHOW_Media software you can set the start of a second instance:
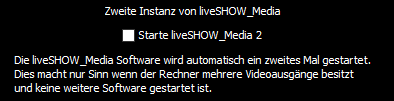
If you select 'Start liveSHOW_Media 2' and then confirm with  a second instance of the liveSHOW_Media program is started.
This setting is saved. Whenever liveSHOW_Media is started, the second
instance is started as well, as long as 'Start liveSHOW_Media 2' is
selected.
Note: If you start two instances of the liveSHOW_Media software on
one computer, the liveSHOWsoftware should run on another computer.