Media File View
menu ( Media) -> (
 Load Media File)
in the Timeline ( )
)
in der Media List ()
Media) -> (Load Media File)in the Timeline (
)in der Media List (
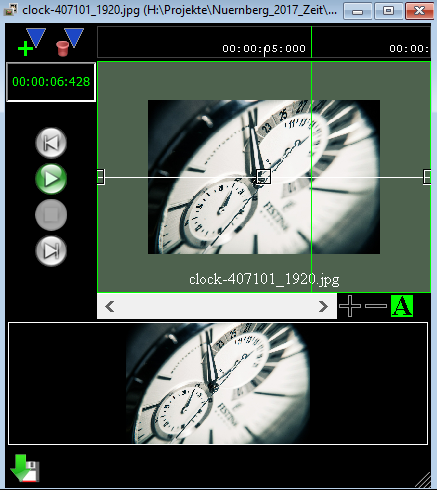
)The media view allows you to view a media file and drag it or a section from it into the timeline or jingle window.
Move the media data in the timeline or jingle window
Rules of display media objects
Video editing software
Rules of display media objects
Video editing software
The basic idea
- You load a media file (text, image or video, in the menu: Load media file), this window will open
- In this window, you can play the media file as a preview, set cutting marks, and specify a range.
Only when you drag an range or the complete media file from this window into the Timeline or the jingle window, it becomes a media object. In the Timeline or the Jingle window (double-click on the jingle), you can set fade parameters for the media object. Then you can close this (preview) window. - The media files are left in the original location in your file system. The program remembers these places.
- To export an entire project to another computer, you can use the export function (Menu: Project - Export Project). This will copy all necessary media files into the project folder.
- The
playback of a media object in the timeline or jingle takes place on a
'media server'. - you need the liveSHOW_Media software
This requires:
-
On
a computer the LiveShow_Media program must be running and this
computer must be connected to the LiveShow computer over a network.
(It can also be the same computer, provided it is so powerful that it can work with the media playback and the liveShow.) - In the LiveShow program, you must add a MediaServer (Menu: Media - MediaServer) and connect it to the LiveShow_MediaServer program.
- The media object in the timeline must be assigned to the media server (double-click on the media object, the object properties window opens, in the 'media object settings' tab) you can assign the media server and determine the playback position).
-
On
a computer the LiveShow_Media program must be running and this
computer must be connected to the LiveShow computer over a network.
Note: HTML files with images, hyperlinks, etc. can not be used. You can only use HTML files that contain plain text.
Reason: Images are not stored in HTML with the HTML file, but only a link to an image file is stored. The LiveShow software transfers only the one HTML file to the media server, so the images are not transferred!
RTF file rendering in Java is not yet able to display special content like images, hyperlinks, tables, etc. correctly.
Note: RTF texts should be written in a large font size!
Note: Texts or images can be edited at runtime via a corresponding editor. The LiveShow program automatically detects when media files have changed and accepts the changes. You should, however, make sure that you are actually editing the file that is currently open by the LiveShow program - if you open or import an exported project, the media files from the project folder are opened and no longer the original files ). You can view the currently used media files in the list of media files - Media List.
RTF texts can be modified and created under Windows with the Wordpad and under the Mac with the TextEdit. HTML texts can be edited under Windows with the NVU web editor and under the MAC with Amaya. Images can be edited with the Gimp program. NVU, Amaya and Gimp you can download free on the Internet.
The playback
The time display shows the position of the play cursor.
The time display shows the position of the play cursor.
 |
Plays the media file from the play cursor position. |
 |
Playback pauses, the playcursor stops |
 |
The play stops, the play cursor jumps back to the beginning |
 |
The play cursor jumps to the beginning |
 |
The play cursor jumps to the end |
The scroll bar:

 |
The view is widened horizontally (zoomed) You can also zoom with the mouse wheel. |
 |
The view is reduced horizontally You can also zoom with the mouse wheel. |
 |
By clicking on , you can switch the automatic tracking of a PlayCursor on and off. The picture shows the current state:  Tracking is disabled Tracking is enabled Tracking is disabled Tracking is enabled By
moving the scroll bar, you have moved the visible area so far that the
PlayCursor is no longer visible - tracking is temporarily switched off. By
moving the scroll bar, you have moved the visible area so far that the
PlayCursor is no longer visible - tracking is temporarily switched off.Click on A to recapture the PlayCursor. |
 |
change the window size |
The Time bar:

Times are displayed here. You can set the playcursor and add markers to the playcursor position.
Marker
Markers mark a specific position in a media file. Selection ranges snap to markers.
Markers help to cut a media file (video). It makes sense to remember certain intersections with the help of markers.
Markers are automatically saved in a xxx.lsm file by closing the MediaFile view.
 |
Adds a new marker to the Playcursor position |
 |
Deletes a selected marker. |
Markers can be selected by simple clicking, they are then displayed in blue.
Double-clicking on a marker opens a setting window:
Double-clicking on a marker opens a setting window:
Marker-setting window:
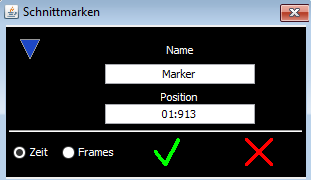
Here you can change the name of the marker and its position.
Time: indicates position in minutes, seconds and milliseconds
Frames: specifies the position in frames.
This is based on the sound sampling rate.
At a sampling rate of 44100Hz, one frame corresponds to a time of 1/44100 seconds
Time: indicates position in minutes, seconds and milliseconds
Frames: specifies the position in frames.
This is based on the sound sampling rate.
At a sampling rate of 44100Hz, one frame corresponds to a time of 1/44100 seconds
Set a selection range
When you move the mouse in the view window while holding down the left button, you can specify a range.
The range is displayed in transparent blue color.
The range is displayed in transparent blue color.
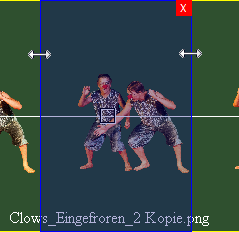
On the left and right margins, you can zoom in and out the range with the left mouse button.
If you have defined markers, the range limits snap to the marker positions.
 Closes the range.
Save actual image (Snapshot)
 |
The currently displayed image is saved as a png file. This allows you to create snapshots from a movie. (The quality of the image depends on the current screen resolution.) |
Move the media data into the Timeline or the Jingle window
If you hold down the left mouse button within a range, you can drag the range into the timeline or jingle window.
If you hold the left mouse button outside of a range, you can drag the entire media file into the timeline or the jingle window.
Note: The range is automatically set to the complete length.
If you hold the left mouse button outside of a range, you can drag the entire media file into the timeline or the jingle window.
Note: The range is automatically set to the complete length.
The following rule applies to the display of media files:
If several media objects are played simultaneously, the projections will be superimposed. Thus, an image of a media object is displayed above the image of another media object. In the Timeline, the tracks are used to decide which picture is in front of another. Jingles are always displayed before all images from the Timeline.
In the Timeline
A media object that is located in a higher track is in front of a media object of a lower track.
In other words, if you drag a media object into an upper track and the media data do not have transpent surfaces, only that media object will be visible. If the media data of the media object has transparencies, then a media object of a deeper track will be seen through these transparencies.
Media-Jingles
Media jingle has a Z-Order , which determines whether an image / video / text is visible in front of another. This corresponds approximately to the layer technique from graphics programs.
The following rules apply:
In the Timeline
A media object that is located in a higher track is in front of a media object of a lower track.
In other words, if you drag a media object into an upper track and the media data do not have transpent surfaces, only that media object will be visible. If the media data of the media object has transparencies, then a media object of a deeper track will be seen through these transparencies.
Media-Jingles
Media jingle has a Z-Order
, which determines whether an image / video / text is visible in front of another. This corresponds approximately to the layer technique from graphics programs.The following rules apply:
- The lower the value, the further the foreground is the medium (negative values are allowed).
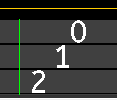
- In the Timeline, the media tracks determine the Z-order value.
The top track has the Z-order value 0, the next has the value 1, ...
- If two jingle have the same Z-order value, then it is random which medium lands in the foreground.
Tip video editing software
The liveSHOWsoftware has its own video converter. If videos are not played correctly (jerky) in the liveSHOWsoftware, the video can be adjusted with the video converter.For further changes to the video, video editing software must be used, e.g. the free software Shotcut.org, which also enables the export of a film to the Quicktime animation format.
The Quicktime animation format allows transparent content within a movie.