 Windows) -> (
 Jingles)
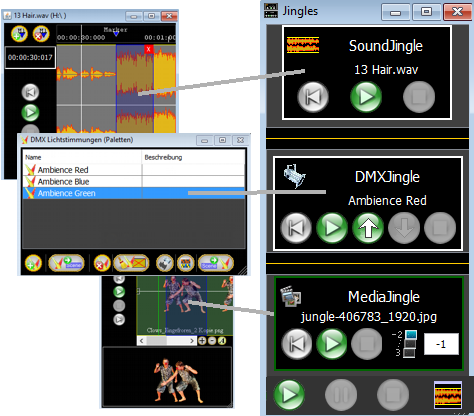
 |
|
 Jingleview Jingleview |
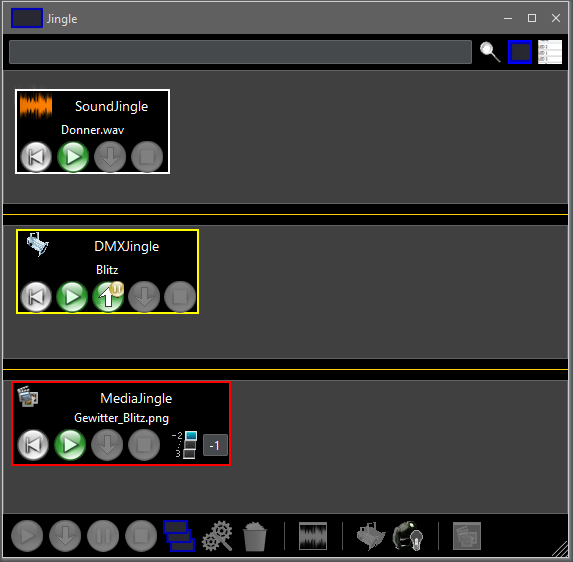
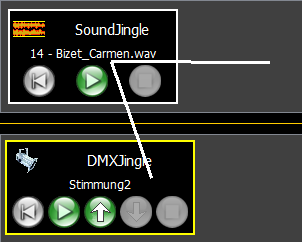
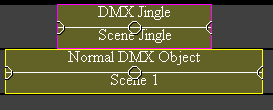
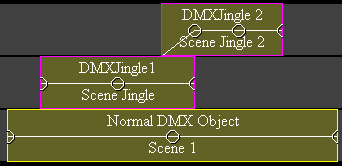
Jingleview New jingles can only be created in this view by dragging sound areas, lighting scenes, media areas and triggers into the respective area of the jingle view. |
 Tableview Tableview |
Tableview No new jingles can be created here. A table is displayed for each area (sound/DMX/media). Various properties of the jingle are displayed in the tables. 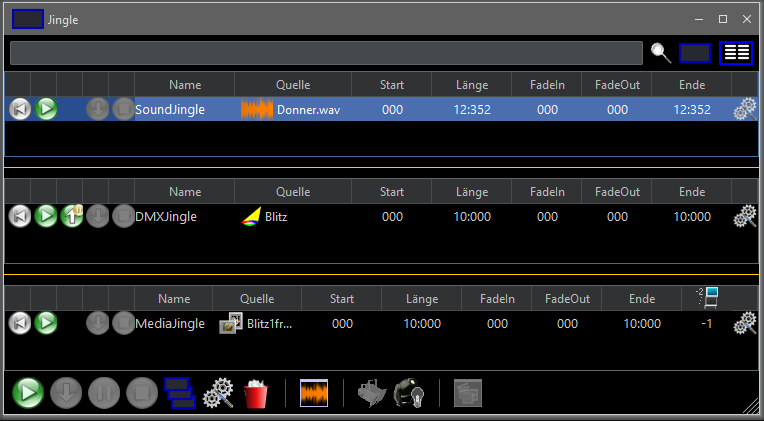 Some of the properties can be changed by double-clicking in a table cell. Note: The sources can only be changed for DMXJingle or MediaJingle (if the source is an image, a text or a trigger). SoundJingle or MediaJingle with a video file as the source do not allow the source to be changed.  The play buttons works like the buttons in the jingle view - see further down. . The play buttons works like the buttons in the jingle view - see further down. .If a jingle is currently playing, the name is displayed with an orange background:  |
| Filter jingle |  A search term can be entered in the text field. All jingles whose name or source does not contain the search term are hidden in the table view or grayed out/deactivated in the jingle view. If the search term is removed, all jingles are displayed normally again. The jingle selection is also emptied. Note: By pressing the Return key in the empty text field, the jingle selection can be emptied without filtering the jingles. |
|
Plays all selected jingles. |
 |
Fades out all selected and running jingles directly. The fade out time can be set in the individual jingles - object settings. |
 |
Pause all selected jingles |
 |
Stop all selected jingles |
 |
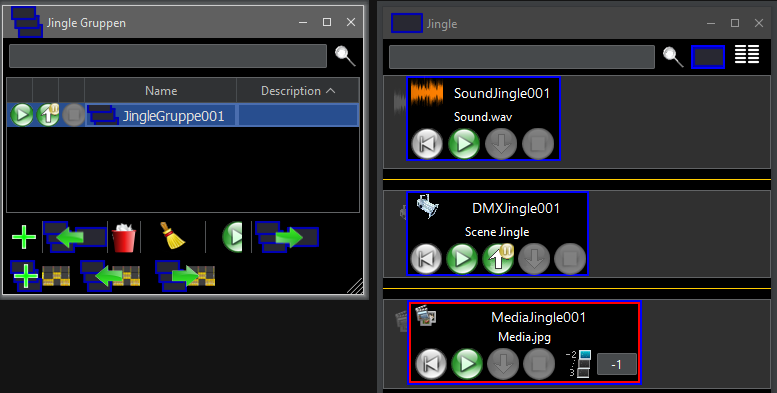
Opens the Jingle Groups window. Here you can group jingles. If a jingle group is started, all jingles assigned to this group are started. |
 |
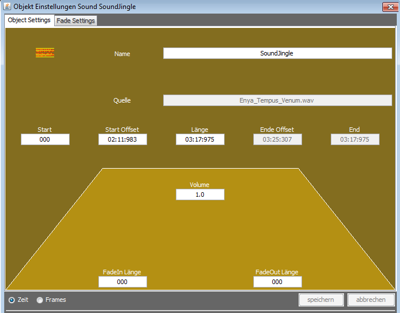
If only one jingle is selected, the object settings of the selected jingle are opened. |
 |
All selected jingles will be deleted. |
 |
Opens the sound file view of the selected sound jingle |
 |
In the DMX Stage View, displays all the lamps used by the selected DMX jingle (whose dimmer value is> 0). |
 or or  |
Changes the behavior of moving heads during the fade process. If the icon is gray, the moving heads will move during the fade process with the lamp turned off (blackout). If the icon is yellow, the moving heads will move with the lamp on during fade. This setting is automatically saved when you exit the software. |
 |
Opens the media file view of the selected media jingle |
 |
Change the window size |
 |
Sets the playcurcor (not visible) to the beginning |
 |
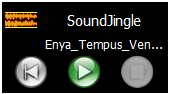
Starts the sound jingle The button changes to the pause button |
|
If a sound jingle is started, this button can be used to fade out the jingledirectly, without playing it to the end. The fade out time must be set in the object settings of the jingle - see above Object settings |
 |
Stops playing the Playcursor remains at the current location The button changes to the play button |
 |
Stops playback and sets the play cursor to the beginning. |

|
Sets the playcurcor (not visible) to the beginning |
|
Plays the light ambience (object) from the playcursor. The button changes to the pause button |
|
Stops playing the Playcursor remains at the current location The button changes to the play button |
|
Stops playback and sets the play cursor to the beginning. |
 |
The DMX object is fadet in and paused after the set fade in time. The jingle is not played completely but stops after the fade in process. Note: If a start time > 0 is set for the jingle, the fade-in process starts after the start time. |
|
The DMX object is faded out directly and stops - according to the set fadeout time. The jingle stops automatically (the PlayCursor is set back to the beginning) after the fade out operation. |
, hold down the
mouse button and then move the mouse up or down to fade the DMXJingle in
or out. .
is selected. Now, when starting the jingle, all dimmers of the involved
moving heads are set to 0, the new position is approached and then the
dimmers are set to the set dimmer value., then the Position and then the Dimmer Jingle, this has the following effect:, Position Jingle and finally Blackout Jingle.
.
is selected. Now, when starting the jingle, all dimmers of the involved
moving heads are set to 0, the new position is approached and then the
dimmers are set to the set dimmer value., then the Position and then the Dimmer Jingle, this has the following effect:, Position Jingle and finally Blackout Jingle.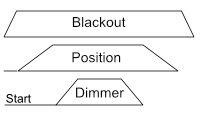 |
The blackout jingle starts first, the position jingle starts later and then overwrites the blackout jingle the dimmer jingle starts last again overwrites the position jingle. Since in the jingle accordingly lamps and certain lamp functions are deactivated: the dimmers are faded out (blackout), the lamps change positions (position) and then the dimmers are raised (dimmer) towards the end the dimmer jingle is moved out, then the position jingle and finally the blackout jingle is moved out. |

 , which determines whether an image / video / text is visible in front of another. This corresponds approximately to the layer technique from graphics programs.
|
Sets the playcurcor to the beginning |
|
Plays the media object from the playcursor. The button changes to the pause button |
|
If a media jingle is started, this button can be used to fade out the jingle directly, without playing it to the end. The fade out time must be set in the object settings of the jingle - see above Object settings |
|
Stops playing the Playcursor remains at the current location The button changes to the play button |
|
Stops playback and sets the play cursor to the beginning. |
|
A Z-Order value can be entered here. Pressing the return key takes over the value. The lower the Z-order value, the further in the foreground the medium is displayed. |
in the Jingle window opens the Jingle Groups window.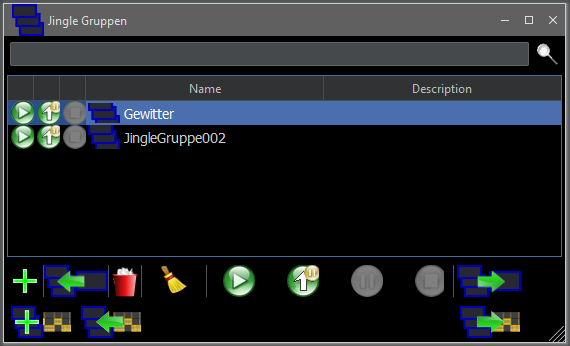 , the jingles start together and play through to the end. . The jingles are started together and when the last jingle is faded in, all jingles pause. The Play start button
  can then be used to start the jingles again, the individual jingles then play through to the end.
 |
Adds a new jingle group. All selected jingles from the jingle window are linked to the group. |
 |
Overwrites the selected jingle group with the selected jingle of the jingle window. This is only possible if a single jingle group is selected. A jingle group can be selected by clicking on the corresponding table row. |
|
Deletes all selected jingle groups. |
 |
Deletes all empty jingle groups. A jingle group is empty if no jingle is assigned to it. A jingle group can also be empty if its assigned jingles have been deleted from the jingle window. |
|
Starts all selected jingle groups. Starts all jingles assigned to the selected jingle groups. The background color of a jingle group changes: When all jingles of the jingle group are played  If only one or a some jingle from the jingle group is played 
|
|
Fades in all selected jingle groups with the following rule:
All three jingles (blackout, position, dimmer) are started together, if the last jingle (dimmer) is faded in, all jingles pause at the red line: Set the start times of the position jingle and dimmer jingle so that the position jingle starts after the fade-in of the blackout jingle and the dimmer jingle starts after the fade-in of the position jingle. Set the lengths of the jingles so that the dimmer jingle fades out first, then the position jingle, and finally the blackout jingle. 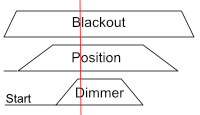 Excample 2: 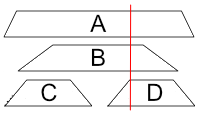 All jingles pause here when jingle D has been faded in. Jingle C has already been played in full, but had already been faded in by then. The button changes to the FadeStart button , with which you can restart the pausing jingle. The jingles continue to play from the red line to the end. |
|
The running jingles in the selected jingle groups
are faded out directly, according to the fade out times set in the
individual jingles. Note: In the example of spectator lighting with moving heads, this does not make sense because the individual jingles are faded out directly and not with a time delay. |
|
Pauses the playback of all selected jingle groups. |
|
Stops all selected jingle groups. |
|
Selects all jingles in the jingle window that are assigned to the selected jingle groups. |
 |
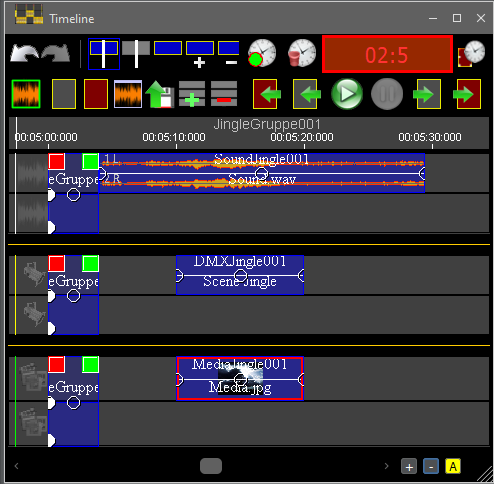
A new jingle group is created based on the selected objects in the timeline. A new jingle is created for each selected object in the timeline. If the object has a name, the jingle is given the same name. This name is later used as a reference between the object in the timeline and the jingle. If a scene bridge is also selected, this is used as a reference for the relative start time of the jingle and the jingle group is given the name of the scene bridge. If several scene bridges are selected, the first selected scene bridge (first position in the timeline) is used. The jingle of the first selected object starts according to its distance from the start time of the scene bridge. All other jingles are given a start time according to the relative position of the respective objects in the timeline. If no scene bridge is selected, the first jingle starts at 0 and all others according to their relative position to the first object. |
 |
The selected jingle group is overwritten using the selected objects in the timeline. This is similar to creating a new jingle group, except that no new jingle group is created here, but the referenced jingles of the selected jingle group are changed. For each selected object in the timeline, the corresponding jingle with the same name as the selected object is searched for. The jingle is changed according to the properties (fade times, duration, start time, etc.) of the selected object. If no jingle with the corresponding name is found, a new jingle is created. The name serves as a reference between an object in the timeline and a jingle. A scene bridge must also be selected in the timeline so that the start times match if the first jingle is not to start at 0. The first jingle then starts according to the distance between the referenced object and the start time of the scene bridge in the timeline. |
 |
If a jingle group is selected, an object is created at the
end of the timeline for each jingle in the jingle group; all objects
created in this way are then selected in the timeline. The relative
start times of the objects correspond to the start times of the
respective jingles. In addition, a scene bridge is created with the name of the jingle group. This scene bridge can be used as a reference for the relative start times of the jingles if a new jingle group is to be created from the created objects or a jingle group is to be overwritten - see the last two points above. Special feature: DMX objects in the timeline that are created in this way are marked as 'Jingle' and behave in the timeline as if a jingle is being started. This means that the DMX values of a jingle object are not added to the others, but replace the values from the timeline - see DMX jingle in timeline above. Note: To change an existing jingle group, it makes sense to first display it in the timeline using this button, change it there and then overwrite it again. |