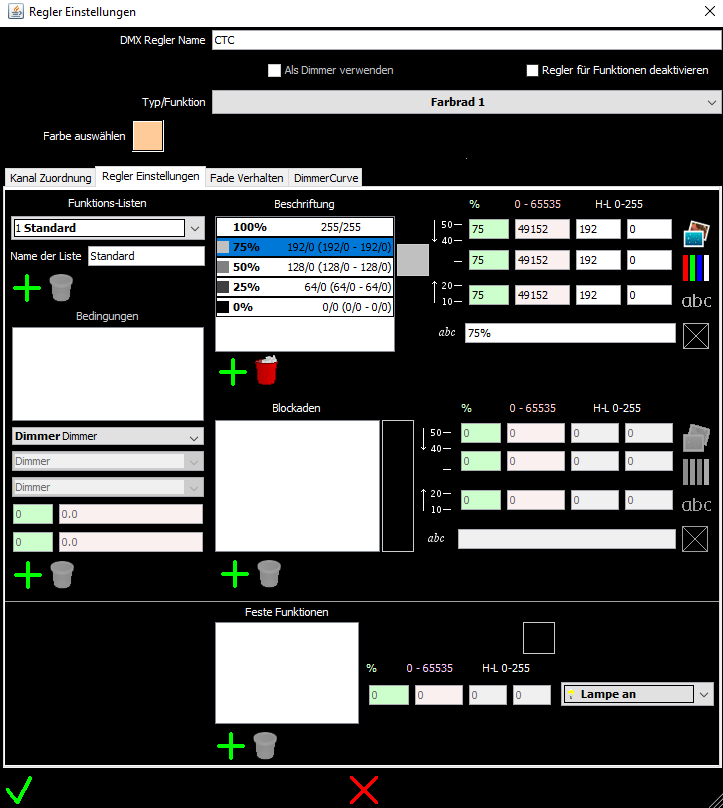
Here you can set the DMX channel assignment and the other settings (appearance) of a controller.
This is possible in the DMX Miixer or the DMX Device Editor. In the DMX Device Editor, fixed functions of a lamp type can also be defined for a controller.
This is possible in the DMX Miixer or the DMX Device Editor. In the DMX Device Editor, fixed functions of a lamp type can also be defined for a controller.
In the mixer panel
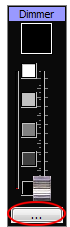
Select the controls
The Controller Settings
DMX-Controller types
Contoller Settings
Special features in the DMX Device Editor
Note: Unfortunately, many lamp manufacturers are used to overload the lamps with functions and to equip individual DMX channels of their lamps with different functionalities.
The good news is that with this program you can also get such complex lamps under control.
The bad news is that this complexity makes the simple assignment of lamp functions to controllers also complex.
Select the controls
The Controller Settings
DMX-Controller types
Contoller Settings
Special features in the DMX Device Editor
Use the controller as dimmer replacement
Deactivate the controller for functions
Deactivate the controller
Deactivate the controller for precalculation
Deactivate the controller for functions
Deactivate the controller
Deactivate the controller for precalculation
 |
Saves the changes | |
 |
Discards changes | |
 |
Change the window size |
Note: Unfortunately, many lamp manufacturers are used to overload the lamps with functions and to equip individual DMX channels of their lamps with different functionalities.
The good news is that with this program you can also get such complex lamps under control.
The bad news is that this complexity makes the simple assignment of lamp functions to controllers also complex.
In the Mixer Panel
Select the controls
A lamp usually has different characteristics (e.g., dimmers, RGB, extra color, stroboscope, etc.). For each of these properties, controls must be added to the mixer. Some of these properties are continuously controllable, e.g. the dimmers, some properties have discrete values, e.g. a color wheel.
In order to determine all the characteristics of a lamp, 5 controller types are generally sufficient:
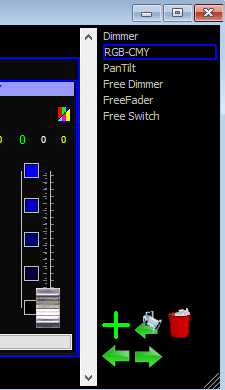
To add a controller to the mixer, click the controller type, and then click.
A marked controller is displayed with a blue frame, the following can be done with a selected controller:
 .
.
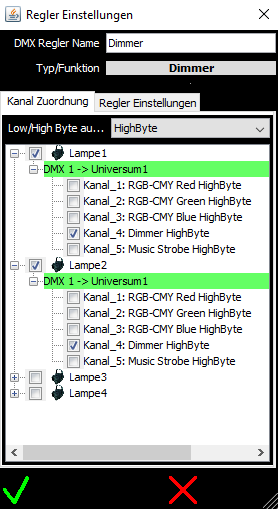
If you have selected a controller as described above, you can assign one or more channels to one or more lamps to the controller. Likewise, they can also disconnect connected channels.
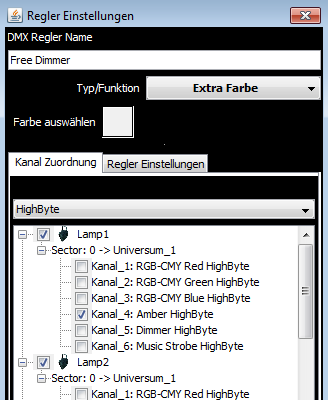
Please note: With the DMX Device Editor, you will only see one lamp, since this is the settings for a lamp type.
In the lower part of the window you will see a tree view of all the lamps with their channels, as mentioned at the lamp editor you will only see one lamp.
To make a connection to the controller, simply click on the check box in front of the corresponding channel:
Lamps can have one DMX channel or two DMX channels for a property (dimming, color wheel etc.). If a property of the lamp occupies two DMX channels, you may also need two hardware controllers for a hardware mixer.
In the liveShow software you can assign both channels to a controller.
All controllers in the liveShow software have a resolution of 2 bytes, they can be assigned two DMX channels (one for the high byte and one for the low byte).
To do this, you can select whether the DMX channel is the most significant byte (HighByte, sometimes also MSB for most significant byte) of the controller or the low-order byte (LowByte, in the lamp instructions, sometimes LSB is also for lowersignificant byte ) of the controller.
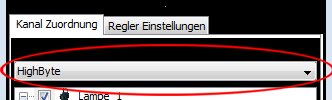
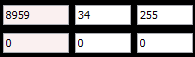
If a property of your lamp has a resolution of only one byte, ie a value range of 0-255, assign only the high-order byte (HighByte) in the channel assignment.
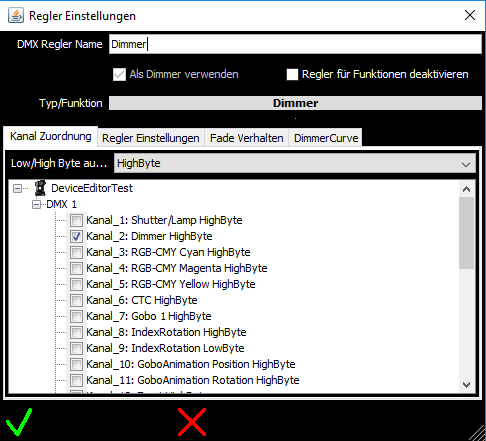
To disconnect, simply remove the hook.
This functionality must be assigned to the controllers in the lamp definition for the lamp editor or the DMX mixer.
These assignments are used by the program to find the same functionalities for different lamps. This is e.g. important when replacing a lamp.
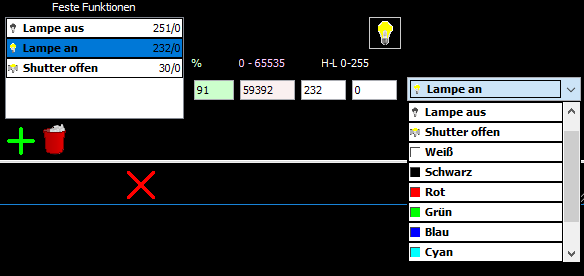
There are controllers whose functionality is fixed, e.g. the dimmer control, PanTilt control or the RGB control. However, there are also free controllers, to which you can assign functionality from a list.
For this purpose, there are a selection list for controller settings in which the predefined functionalities / types are listed:
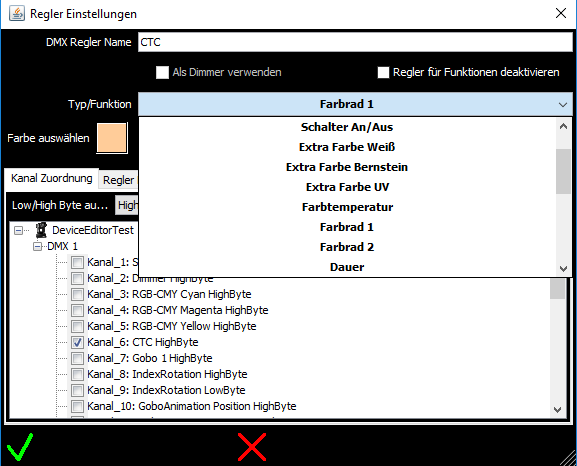
If the function of the controller is not unique or is a mixed form of different functions, simply assign 'undefined'.
The whole thing is a bit difficult to explain, so I'll try again in other words:
Let us consider two lamps, lamp1 and lamp2, and both lamps have, for example, the stroboscope function.
A DMX control can be used to change a specific function of a lamp (dimmer or stroboscope or color wheel, ..).
Let's assume that with the lamp1 the stroboscopic function is on channel 1, but with the lamp2 the stroboscopic function is on the channel 6.
In order to allow the software to change the stroboscopic function of both lamps, the software must know which DMX channels (DMX controls) need to be changed, this being done by assigning the functionality to a DMX controller. Now the software is aware that it has to change the channel 1 for the lamp 1 and the channel 6 for the lamp 2, if the stroboscopic function is to be changed.
With a controller that changes various functions (shutter on, lamp reset, lamp calibration, ..), it makes no sense to assign a function. With a dimmer, however, it makes perfect sense to assign a function (dimmer function), since many other lamps certainly have an identical or at least similar function.
The main mixer also uses the functionality of the controller to decide whether to change the values of a controller by the main dimmer or not.
The following functions are influenced by the main mixer:
* Dimmer
* Subdimmer
* RGB
* extra color amber (amber), white or UV
If a lamp does not have a main dimmer (for example, LED bars) you must click 'Use as dimmer' for each RGB component and for each extra color of the lamp. In the case of the extra color, the controller must also be assigned the extra color (amber, white or UV) as a function. Now these DMX controls / channels will also be dimmed down accordingly when the main dimmer is shut down.
Dimmers are intended for lamps that have a main dimmer, sometimes it can also be the shutter channel.
FreeDimmers are designed for lamps with additional continuously dimmable channels, e.g. an extra color.
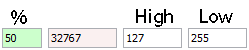
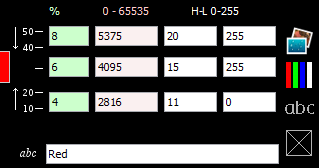
The set value is displayed in gray tones of black (value 0 ) to White (value 65535
  ) .
) .
With free dimmers, you can still set the color for the status display, the values are then displayed in hues from black to the set color.
Above you can specify the name of the controller (usually a name that describes the functionality of the controller).
You can also assign a functionality / type to the controller.
By clicking on the status display (square above the controller), a quick selection list opens in which certain values can be selected on the quick.
This list and the boxes directly in front of the control knob correspond and can be changed - see Controller-Settings.
In contrast to dimmers, the status (set value) is expressed in discrete images, e.g. .
.
By clicking on the status display (square above the controller), a quick selection list opens in which certain values can be selected on the quick - see Controller-Settings..
In some theaters, lamps with a direct DMX input are connected to a DMX dimmer pack, which acts as an on / off switch. Thus the power supply of these lamps can be switched on or off via the software. The FreeSwitches are designed for controlling such dimmer packs. Another possibility would be for a fogger to turn the fog on and off, unless you want to do this via a FreeFader.
By clicking on the status display (square above the controller), a quick selection list opens in which certain values can be selected on the quick - see Controller-Settings..
Of course, here only list elements for 0% and 100% make sense.
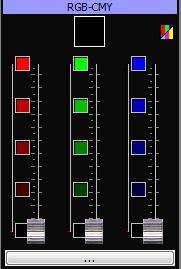
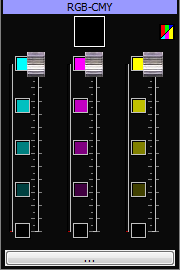
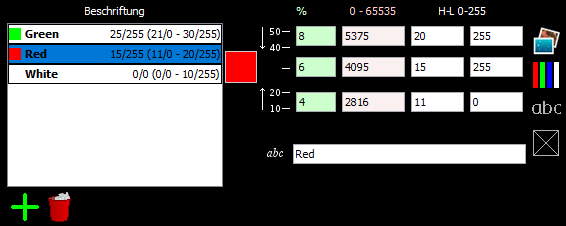
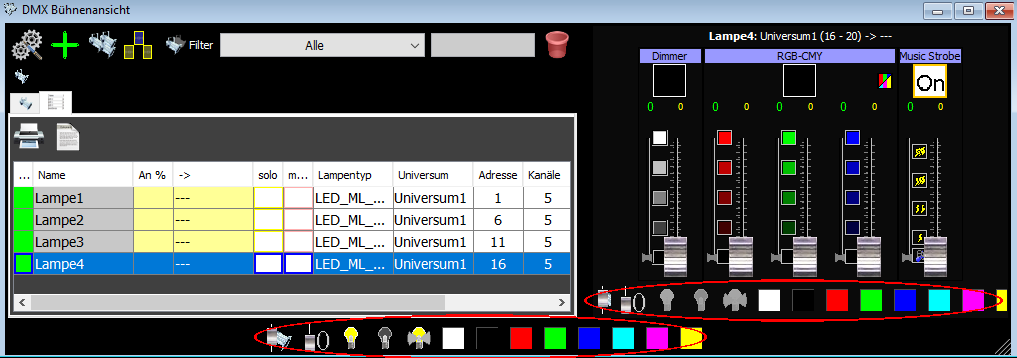
RGB / CMY elements have six controls, one for the red color, one for the blue color, one for the green color, one for cyan, one for magenta and one for yellow, .
However, only three controls are displayed, ror-green-blue for the RGB display and cyan-magenta-yellow for the CMY display. Use RGB_CMY to toggle between the displays.
ATTENTION: The element has six controllers, but only three controllers are required for one lamp type. For RGB lamps, use only RGB controllers in the channel assignment, and CMY lamps only use the CMY controls when assigning channels.
The positions of the three controllers (not shown) are always automatically calculated and adjusted.
For the definition of the fixed functions (see below), it is also sufficient to specify the colors for the appropriate controllers (eg the "Red color" function, the red, green and blue values) and the "Cyan" function Regulator Cyan, Magenta and Yellow)!
To change the channel assignments or to change the controller settings, you must first select a Red, Green or Blue controller in RGB lamps, and a Cyan, Magenta or Yellow control for CMY lamps. All changes then only affect this controller!
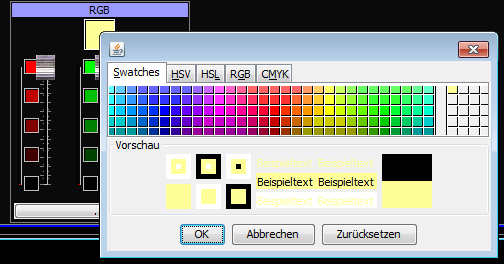
The status (the adjusted RGB / CMY values) is displayed as the corresponding color
Clicking on the status display opens the color selection window.
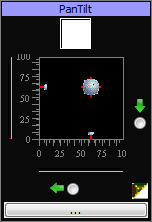
Pan / Tilt elements have no slider but a knob within a rectangle, they have two dimensions, one for horizontal
deflection (Pan) and for vertical deflection (tilt).
within a rectangle, they have two dimensions, one for horizontal
deflection (Pan) and for vertical deflection (tilt).
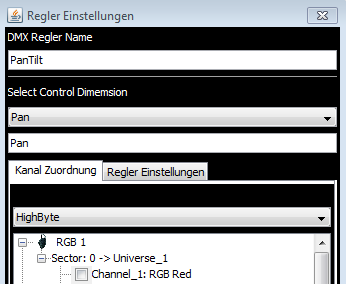
For the Pan dimension and the Tilt dimension, DMX channels must be assigned.
For the channel assignment you must first select the dimension (Pan or Tilt) and then HighByte or LowByte.
If your lamp supports the high resolution, you have to set the channel assignment for 2 DMX channels for Pan and Tilt (one assignment for HighByte and one assignment for LowByte).
If your lamp has a low resolution, it will have only one DMX channel for Pan and Tilt. In this case, it is sufficient to specify the channel assignments only for HighBytes.
Die Statusanzeige/Schnellauswahl hat hier momentan keine Funktion.
The status display has no function at this time.
In addition, the PanTilt element has three additional adjustment buttons:
In order to determine all the characteristics of a lamp, 5 controller types are generally sufficient:
- Controller for continuous features (dimmers, additional adjustable colors, ..) (dimmer, FreeDimmer)
Whereby the Dimmer regulator corresponds to the actual light / dark regulator of a lamp and the FreeDimmer can be used for e.g. extra colors) - Controllers for discrete properties (Farbräeder, Gobos, Spezial-Effects, ..) (FreeFader)
- Controller as switch (Freeswitch)
- Controller for color mixtures (RGB-CMY)
- Controller for movements (PanTilt)
To add a controller to the mixer, click the controller type, and then click
. |
Adds a controller to the mixer |
Select controller
To select a controller, click the blue name of the slider.A marked controller is displayed with a blue frame, the following can be done with a selected controller:
 |
Deletes the selected controller | |
| Moves the selected controller one position to the left in the mixer | ||
| Moves the selected controller one position to the right in the mixer |
Import controllers
If you want to import the controllers from a different lamp type, because many of the controllers are the same or similar, you can do so by clicking on . |
Imports all controllers of a lamp type. The file selection window opens in which you can select a lamp type. |
The Controller Settings
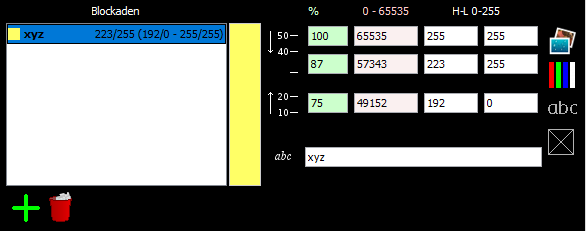
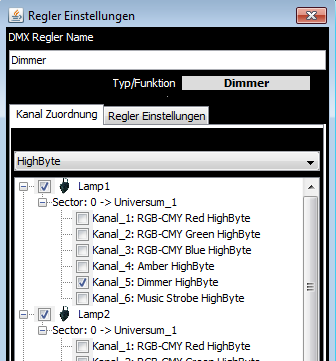
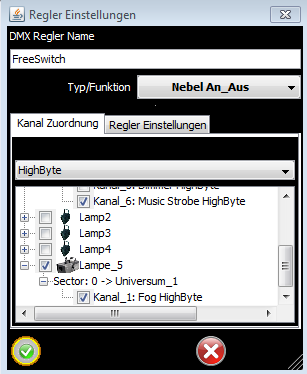
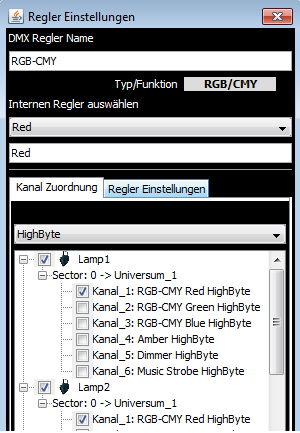
The following can be set after clicking on the button (...) of a controller.Assign DMX (lamp) channels
Controllers can be connected to several lamp channels (DMX channels). When operate the controller, all connected channels are affected.If you have selected a controller as described above, you can assign one or more channels to one or more lamps to the controller. Likewise, they can also disconnect connected channels.
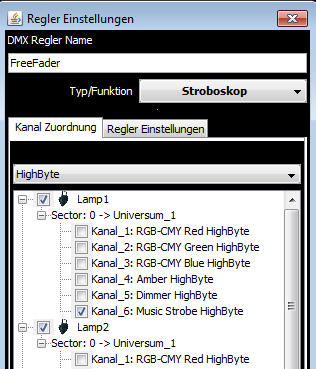
Please note: With the DMX Device Editor, you will only see one lamp, since this is the settings for a lamp type.
In the lower part of the window you will see a tree view of all the lamps with their channels, as mentioned at the lamp editor you will only see one lamp.
To make a connection to the controller, simply click on the check box in front of the corresponding channel:
Lamps can have one DMX channel or two DMX channels for a property (dimming, color wheel etc.). If a property of the lamp occupies two DMX channels, you may also need two hardware controllers for a hardware mixer.
In the liveShow software you can assign both channels to a controller.
All controllers in the liveShow software have a resolution of 2 bytes, they can be assigned two DMX channels (one for the high byte and one for the low byte).
To do this, you can select whether the DMX channel is the most significant byte (HighByte, sometimes also MSB for most significant byte) of the controller or the low-order byte (LowByte, in the lamp instructions, sometimes LSB is also for lowersignificant byte ) of the controller.
If a property of your lamp has a resolution of only one byte, ie a value range of 0-255, assign only the high-order byte (HighByte) in the channel assignment.
To disconnect, simply remove the hook.
Controller Name
Here you can enter a name (dimmer, strobe etc.) for the controller. This name is displayed in the mixer above the knob.Functionality of the controller
A controller is required to control one or more DMX channels of a lamp. Each of these lamp channels will change a particular property / function of the lamp.This functionality must be assigned to the controllers in the lamp definition for the lamp editor or the DMX mixer.
These assignments are used by the program to find the same functionalities for different lamps. This is e.g. important when replacing a lamp.
There are controllers whose functionality is fixed, e.g. the dimmer control, PanTilt control or the RGB control. However, there are also free controllers, to which you can assign functionality from a list.
For this purpose, there are a selection list for controller settings in which the predefined functionalities / types are listed:
If the function of the controller is not unique or is a mixed form of different functions, simply assign 'undefined'.
The whole thing is a bit difficult to explain, so I'll try again in other words:
Let us consider two lamps, lamp1 and lamp2, and both lamps have, for example, the stroboscope function.
A DMX control can be used to change a specific function of a lamp (dimmer or stroboscope or color wheel, ..).
Let's assume that with the lamp1 the stroboscopic function is on channel 1, but with the lamp2 the stroboscopic function is on the channel 6.
In order to allow the software to change the stroboscopic function of both lamps, the software must know which DMX channels (DMX controls) need to be changed, this being done by assigning the functionality to a DMX controller. Now the software is aware that it has to change the channel 1 for the lamp 1 and the channel 6 for the lamp 2, if the stroboscopic function is to be changed.
With a controller that changes various functions (shutter on, lamp reset, lamp calibration, ..), it makes no sense to assign a function. With a dimmer, however, it makes perfect sense to assign a function (dimmer function), since many other lamps certainly have an identical or at least similar function.
The main mixer also uses the functionality of the controller to decide whether to change the values of a controller by the main dimmer or not.
The following functions are influenced by the main mixer:
* Dimmer
* Subdimmer
* RGB
* extra color amber (amber), white or UV
If a lamp does not have a main dimmer (for example, LED bars) you must click 'Use as dimmer' for each RGB component and for each extra color of the lamp. In the case of the extra color, the controller must also be assigned the extra color (amber, white or UV) as a function. Now these DMX controls / channels will also be dimmed down accordingly when the main dimmer is shut down.
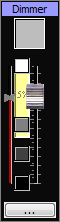
Continuous control: Dimmer, FreeDimmer
These controls are designed for the characteristics of a lamp that allow continuous changes (0-100%).Dimmers are intended for lamps that have a main dimmer, sometimes it can also be the shutter channel.
FreeDimmers are designed for lamps with additional continuously dimmable channels, e.g. an extra color.
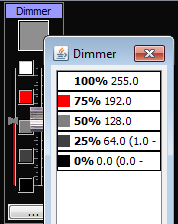
The set value is displayed in gray tones of black (value 0
) to White (value 65535 ) .With free dimmers, you can still set the color for the status display, the values are then displayed in hues from black to the set color.
Above you can specify the name of the controller (usually a name that describes the functionality of the controller).
You can also assign a functionality / type to the controller.
By clicking on the status display (square above the controller), a quick selection list opens in which certain values can be selected on the quick.
This list and the boxes directly in front of the control knob correspond and can be changed - see Controller-Settings.
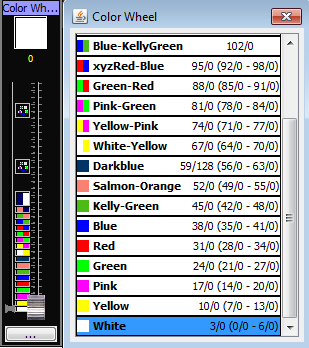
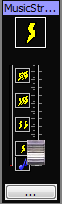
Discreet controls: FreeFader (for functions like ColorWheel, GoboWheel, .....)
Free faders are designed for lamp channels that have special discrete features (music control, stroboscope, lamp on / off, etc.) or combinations. In contrast to dimmers, the status (set value) is expressed in discrete images, e.g.
.By clicking on the status display (square above the controller), a quick selection list opens in which certain values can be selected on the quick - see Controller-Settings..
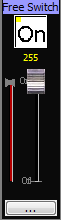
Switch: FreeSwitch (for functions like power supply, fog on / off, ...)
This controller knows only two states, either 0% or 100%, and switches it exactly in the middle of the control setting.In some theaters, lamps with a direct DMX input are connected to a DMX dimmer pack, which acts as an on / off switch. Thus the power supply of these lamps can be switched on or off via the software. The FreeSwitches are designed for controlling such dimmer packs. Another possibility would be for a fogger to turn the fog on and off, unless you want to do this via a FreeFader.
By clicking on the status display (square above the controller), a quick selection list opens in which certain values can be selected on the quick - see Controller-Settings..
Of course, here only list elements for 0% and 100% make sense.
Color mixing: RGB / CMY element
The RGB / CMY element is intended for lamps which have an RGB color mixture or a CMY color mixture. RGB / CMY elements have six controls, one for the red color, one for the blue color, one for the green color, one for cyan, one for magenta and one for yellow, .
However, only three controls are displayed, ror-green-blue for the RGB display and cyan-magenta-yellow for the CMY display. Use RGB_CMY to toggle between the displays.
ATTENTION: The element has six controllers, but only three controllers are required for one lamp type. For RGB lamps, use only RGB controllers in the channel assignment, and CMY lamps only use the CMY controls when assigning channels.
The positions of the three controllers (not shown) are always automatically calculated and adjusted.
For the definition of the fixed functions (see below), it is also sufficient to specify the colors for the appropriate controllers (eg the "Red color" function, the red, green and blue values) and the "Cyan" function Regulator Cyan, Magenta and Yellow)!
To change the channel assignments or to change the controller settings, you must first select a Red, Green or Blue controller in RGB lamps, and a Cyan, Magenta or Yellow control for CMY lamps. All changes then only affect this controller!
The status (the adjusted RGB / CMY values) is displayed as the corresponding color
Clicking on the status display opens the color selection window.
Motion controller: Pan-Tilt motion element
The Pan / Tilt element is intended for lamps that can change the position of the light cone, e.g. scanners or movingheads. Pan / Tilt elements have no slider but a knob
within a rectangle, they have two dimensions, one for horizontal
deflection (Pan) and for vertical deflection (tilt).For the Pan dimension and the Tilt dimension, DMX channels must be assigned.
For the channel assignment you must first select the dimension (Pan or Tilt) and then HighByte or LowByte.
If your lamp supports the high resolution, you have to set the channel assignment for 2 DMX channels for Pan and Tilt (one assignment for HighByte and one assignment for LowByte).
If your lamp has a low resolution, it will have only one DMX channel for Pan and Tilt. In this case, it is sufficient to specify the channel assignments only for HighBytes.
Die Statusanzeige/Schnellauswahl hat hier momentan keine Funktion.
The status display
has no function at this time.In addition, the PanTilt element has three additional adjustment buttons:
 |
Reverses the direction of Pan Caution: This only reverses the direction of the knob . To adjust the lamps you must use the lamp calibration - see DMX Stage view, Device Settings |
 |
Reverses the direction of Tilt Caution: This only reverses the direction of the knob . To adjust the lamps you must use the lamp calibration - see DMX Stage view, Device Settings |
 |
Toggles between the normal view and the calibrated view. The calibrated view only works when the Pan / Tilt element is connected to lamps which are also calibrated - see DMX Stage view PanTilt calibration. In the calibrated view, you can e.g. always move all the connected lamps to the same point (FollowSpot). |