Play Control
 Windows -
  PlayControl'
The play control controls the playing of the timeline
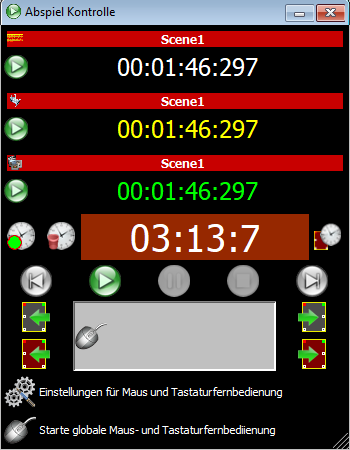
The time display of the PlayCursors:
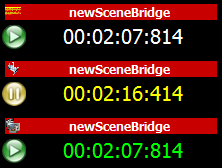
The top line shows the location of the sound cursor, the scene transition you are in and the time within the timeline.
Correspondingly, this is indicated for the light cursor and the media cursor.
Using the buttons

 , you can start and stop sound, light or media cursors individually.
The time display until the next action (scene bridge):

The time to the next scene bridge is displayed here. When playing the timeline, this time will be decreased.
Depending on whether a sound, light or media scene bridge is next, the time up to this scene bridge is displayed.
In principle, this time can be interpreted as time until the next action.
The time is displayed in several ways:
 |
White or green font black background |
There are more than 30 seconds to the next action The white font shows the time the scene bridges are arranged in the timeline. The green font indicates the recorded time (see below) |
 |
Orange writing | There are less than 30 seconds to the next action |
 |
Red font with red frame | There are less than 10 seconds to the next action |
  |
The background turns red | This means that either the sound or the light or all three have been stopped. Three cases can be distinguished:
|
Record time
The arrangement of the scene bridges in the Timeline may not correspond to the actual timeline of the show. Either the area between two scene bridges has been chosen larger for safety reasons, or it is shorter because only the light is involved.In order to have a rough estimate of the actual duration, the time between two scene bridges can be recorded when the show is played.
The Time Recording button
 turns on or off the recording of the time.
You can click the time recording button before the show starts or during the show.
The time from the current scene bridge is measured until the cursor moves to the next scene bridge. The recorded time becomes the property of the current scene bridge and can also be changed manually in the setting window of the scene bridge (double click on the scene bridge - scene bridge settings).
The following rules should be observed:
- Either start recording before the project and end at the end of the project.
- If you do not want to record the time over the whole project, you
should start before a main bridge and stop after a main bridge.
- If you start and stop between two main scene bridges, the times for the
scene bridges between them are not necessarily correct.
 ).
).The recorded time is displayed in green font.
The button
 deletes all recorded times.
Start Stop:
The icons (buttons) react when the left mouse button is released.If you pressed the mouse button on one of the icons and want to cancel the action, move the mouse (with the mouse button pressed) far away from the icon and then release the mouse button.
 |
Sets all cursors to the initial position |
 |
Starts playing sound, light and media |
 |
Stops playback of sound, light and media |
 |
Stops playback of sound light and media, and sets all cursors to the initial position |
 |
Sets all cursors to the end position |
Jumps to scene bridges:
Jumps always go to the next scene bridge or main scene bridge, either the next or the previous scene bridge.This is a bit tricky to put into words, just try it out.
When jumping to the next scene bridge, the cursor moves forward (sound, DMX and media), which is the furthest to the left. The last cursor picks up the other cursors.
When jumps to the previous scene bridge: The cursor always jumps back (sound, DMX and media), which is the furthest to the right.
The icons (buttons) react when the left mouse button is released.
If you pressed the mouse button on one of the icons and want to cancel the action, move the mouse (with the mouse button pressed) far away from the icon and then release the mouse button.
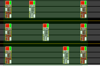
Jumps to the next / previous scene bridge
Jumps to the next scene bridge, this can be a normal scene bridge or a main scene bridge. If it is a main scene bridge, jump all the cursors to this bridge.
 |
Jump to the next scene bridge |
 |
Jump to the previous scene bridge |
Jumps to main scene bridges:
Here, all cursors jump to the next main scene bridge, normal scene bridges are skipped. |
Jump to the next main scene bridge |
 |
Jump to the previous main scene bridge |
Wireless mouse- keyboard - presenter remote control:
The playback of the timeline and jingles can also be remote controlled with a wireless mouse, a keyboard or a presenter.A presenter is a small radio (USB or Blurtooth) that simulates a keyboard with few selected keys, it is mostly used to control PowerPoint presentations.
 If the mouse pointer is within this rectangle, remote control is activated (the background turns green).
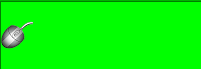
Alternatively, you can click on the mouse symbol
 below, hen the remote control also works outside the rectangle on the complete window of the liveSHOW software.
What is triggered by a mouse/key click can be set individually by clicking on the setting icon
 below.
 |
The remote mouse control configuration window opens. Here each action (e.g. jump to next scene, start jingle,...) can be assigned a mouse click or keystroke event. |
|
The global mouse remote control is opened, here the mouse
and key events function on the complete window of the liveSHOWsoftware. A dialog window appears in which you can terminate the global mouse remote control again. In order to be able to work again normally with the liveSHOWsoftware, you must terminate the global remote control first again. see 'Start mouse-keyboard remote control' |
Tips:
- If you glue the movement sensor on the underside of a mouse with an adhesive tape, the mouse pointer can no longer move.
- With a bit of skill you can also disassemble a wireless maus and install this in an extra box, the mouse buttons can be soldered in parallel extra buttons.
- Logitech has so-called Unified USB receivers, here you can operate several mice via one USB dongle.
Remote control via external devices
AndroidApart from the mouse remote control, there is also the possibility to control the process via an external device. Currently, this is only possible on Android devices. Thanks to the graphical user interface, you can control it more precisely.
Remote control via an Android smartphone is explained in Remote settings.
MIDI
The program SPIT_MidiClient can be downloaded from the liveSHOWsoftware homepage (www.liveshowsoftware.de - menu: 'Download'). With this program it is possible to remote control the liveSHOWsoftware via MIDI controller - see also Trigger.