Configuration of mouse, keyboard-presenter and DMX remote control
 Window -
  PlayControl' - 'Mouse and keyboard remote settings'
Menu Settings-Mouse Keyboard Remote Settings
Here you can assign mouse, keyboard and DMX-events to certain actions of the liveSHOWsoftware (e.g. jump to next Scene, play jingle, ..).
It can be set with which mouse click, which key on the keyboard or with which DMX input an action should be triggered.
For triggering the commands by mouse or keyboard the 'Mouse Keyboard Remote Control' must be started in the 'Settings' menu first.
The DMX commands are executed directly, provided that in the '
 DMX input settings' .in the 'Settings' menu the corresponding DMX universe' is set to 'Remote control'.
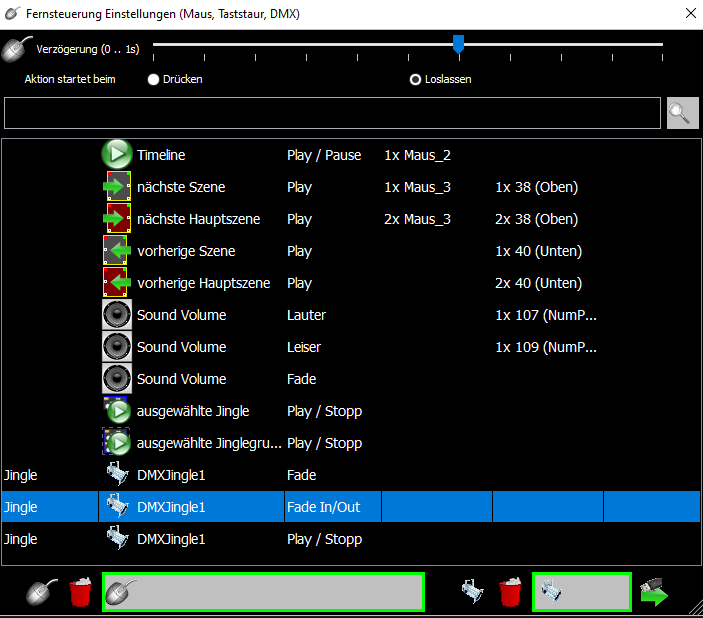
Table of actions
The table lists all actions that can be remotely controlled. There are two types of actions, the general action (e.g. jump to the next scene) and the project-specific actions (e.g. start/stop jingle).general actions:
 |
Start/Stop actual selected jingles. There are two commands for starting selected jingle:
|
 |
Start/Stop actual selected jinglegroups. |
 Play / Pause Play / Pause |
Start/Pause timeline |
 |
Jump to the next scene |
 |
Jump to the next mainscene |
 |
Jump to the previous scene |
 |
Jump to the previous mainscene |
 Louder Louder |
Increases the main volume by approx. 5%. Attention: Some presenters have volume keys that change the volume via the operating system! |
| Quieter |
Decreases the main volume by approx. 5%. Attention: Some presenters have volume keys that change the volume via the operating system! |
| Fade |
This is only available for the DMX inputs, because you can't transmit a specific value by mouse click / keystroke The volume is faded in or out according to the DMX input value. With the DMX input first the current set value of the volume must be caught! If the volume is e.g. set to 50%, the DMX input (possibly hardware controller) must first be moved to 50% and further up or down. |
The general actions are saved independent of the project, they are always available. The delay and the setting, when an action is triggered, are also stored independently of the project.
EXCEPTION: The associated DMX commands are saved with the project, since the assigned input universe is only available in the project.
project-specific actions:
Jinglegroup  |
Starts a certain jingle group or stops a running jingle group If one or all assigned jingles play, the jingles are stopped. If no assigned jingle is playing, all assigned jingles will be started. |
| Jinglegroup Fade In / Fade Out |
Fades in a jingle group: All jingles of the jingle group are started and the jingle group is paused when the last jingle is faded in. Note: The command for fading only works if none of the jingles is active! or Fades out a pausing jingle group: If the jingle group is paused (jingle group is faded in), it is restarted and runs until the end. Note; The command for fading out only works if the jingle group is faded in! This is useful if, for example, a more complex lighting scene consisting of several jingles is to be faded in, left for an indefinite time, and then faded out again in a controlled manner. See: Jingle |
| Jinglegroup Play / Fade Out |
All jingles of the jingle group are started and play through to the end. or If jingles of the jingle group are currently running, all running jingles are directly faded out. This is useful if a short story (e.g. thunderstorm) is to be played with several jingles, i.e. the jingles should not pause after the fade in. See: Jingle |
Jingle  SoundJingle Play / Stop SoundJingle Play / Stop |
Starts/Stops a SoundJingle |
| Jingle SoundJingle Play / Fade Out |
Starts a sound jingle if it is currently not running or fades out a running sound jingle |
Jingle  DMXJingle Play / Stopp DMXJingle Play / Stopp |
Starts/Stops a DMXJingle |
| Jingle DMXJingle Fade In/Out |
Fade In/Out of a DMXJingle |
| Jingle DMXJingle Fade |
This is a special feature of DMX Jingle and only available for DMX inputs. The DMXJingle is faded in or out according to the DMX input value. With the DMX input first the current fade value of the DMXJingle must be caught! If you have set the DMXJingle by software e.g. to 50%, the DMX input (possibly hardware controller) must first be moved to 50% and further up or down. |
Jingle  MediaJingle Play / Stopp MediaJingle Play / Stopp |
Starts/Stops a MediaJingle |
| Jingle MediaJingle Play / Fade Out |
Starts a media jingle if it is currently not running or fades out a running media jingle |
Jingle  TriggerJingle Play / Stopp TriggerJingle Play / Stopp |
Starts/Stops a Trigger(SPIT)Jingle |
| Jingle TriggerJingle Play / Fade Out |
Starts a trigger jingle if it is currently not running or fades out a running trigger jingle |
Mainscene  Play Play |
Starts the mainscene |
Scene_Sound  Play Play |
Starts the Sound-Scene |
| Scene_DMX Play |
Starts the DMX-Scene |
| Scene_Media Play |
Starts the Media-Scene |
The project-specific actions are saved with the project.
Jingle and jingle groups are sorted alphabetically by name.
Mainscenes and Scenes are in the order they are arranged in the Timeline (like in the scene book).
Assigning mouse and keyboard events
Each of the listed actions can be assigned a mouse click event and/or a key event.Step 1:
Select an action from the table by clicking in the corresponding row.

Step 2:
Move the mouse into the left rectangle below the table, this will get a green background, when an action is selected.

Step 3:
To assign a mouse event to the action, click one of the mouse buttons.
To assign a keyboard/presenter event to the action, press a key.
Multiple clicks are detected. The number of mouse clicks or keystrokes is displayed before the mouse or key event (e.g. 2x Mouse_3).
Depending on the set delay, triple and quadruple clicks are possible, but these are not recommended in practice!
Note: Some presenters send different key events when the presenter key is pressed short or long!
Note: The 'Tab' key is often found on presenters. A long press of the 'Tab' key has the effect that all open windows are listed and you can change the current window. If the window is changed, the liveSHOWsoftware loses the focus and you can no longer control it remotely.
To delete the mouse and keyboard event from an action, use the left waste basket
 .
.In order to be able to trigger an action via the mouse or keyboard later, the 'Mouse Keyboard Remote Control' must first be started in the 'Settings' menu.
Otherwise, e.g. mouse clicks on an object or a text field cannot be distinguished from the start of an action.
Setting the delay
To be able to distinguish multiple mouse clicks or keystrokes, the triggering of an action must be delayed.With the slider you can set the delay (0 .. 1second).

If a wireless mouse is modified and a footswitch replaces the mouse button, you will need a longer delay to get a multiple mouse click.
The delay is stored independently of the project.
When the action is triggered
There are two ways of triggering an action.
1.) When pressing the mouse button or key. Here the action is triggered immediately (after the delay time).
2.) Only when releasing the mouse button or the presenter key. This has the advantage that the key can be pressed a little earlier and the action only starts when the key is released.
This setting is stored independently of the project.
Note: When using the 'Tab' key under Windows, a long press can open the window selection and the focus could be lost when switching to another window.
Note: Some presenters are programmed so that a long press on a presenter key sends a different keyboard command.
Assigning DMX Input Channels
An action can also be triggered when a DMX input channel is changed .To do this, at least one DMX universe must be installed which is connected to an input of a DMX interface.
The assignment of a DMX input channel to an action is always saved with the project, since the necessary DMX universe is also dependent on the project.
In the '
DMX Input Settings' the corresponding universe must be set to 'Remote Control'.Step 1:
Select an action from the table by clicking in the corresponding row.
Step 2:
Move the mouse into the right rectangle below the table, this will get a green background when an action is selected.

Step 3:
To assign a DMX event to the action, change the corresponding DMX input channel from below 50% to above 50% by e.g. dragging the corresponding slider of your connected DMX hardware mixer down and then up again.
The DMX channel and the DMX universe are then displayed in the table.
Rule: An action is only triggered if the assigned DMX input channel changes from below 50% to above 50%. So flash keys of a hardware mixer work as well.
Actions xxx Fade are controlled directly, the currently set state/value must first be caught.
To delete the DMX event from an action, use the waste basket on the right.
For triggering an action, the DMX input must be changed from below 50% to above 50%.
Exceptions are the fade actions at the volume and the DMXJingle, here the DMX value is taken over directly, provided that the current state was caught.
Filtering or searching for actions
If the action table contains many actions, this can become somewhat confusing. You can use the following methods to reduce the list or find certain events.
 Here you can enter a search text, the list of actions is reduced to the actions that contain the search text. |
 If you move the mouse into this field, it will turn green. If you click with the mouse, press a key or change a DMX input channel, the assigned action is selected. If no action is assigned, the selection is removed. |
Tips:
- If you tape the motion sensor on the underside of a wireless mouse with adhesive tape, the mouse pointer can no longer move..
- With some hobby skills you can also dismantle a wireless mouse and install it in an extra box, at the mouse buttons you can solder parallel extra buttons.
- Logitech has so-called Unified USB receivers, here you can operate several mice via one USB dongle.
- There are USB digit blocks that work like a small keyboard.
- Presenters work like a keyboard with few keys.
Starting the global mouse/keyboard remote control
The global mouse/keyboard remote control can be started via the menu 'Settings' - 'Start mouse/keyboard remote control'.
A dialog window opens, the mouse and keyboard events work on the complete window of the liveSHOWsoftware.
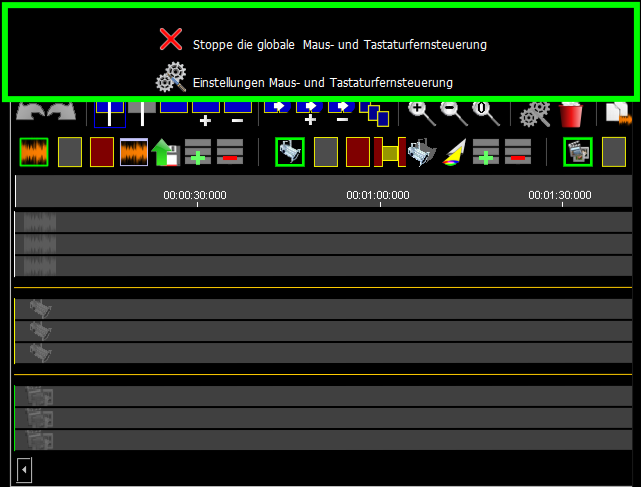
In order for the mouse and keyboard events to be recognized by the liveSHOWsoftware, the liveSHOWsoftware must have focus and the mouse must be over the liveSHOWsoftware window.
The frame around the dialog box indicates whether the mouse and keyboard commands work:
 |
Green frame - the mouse and keyboard commands work. The liveSHOWsoftware has the focus and the mouse is over the liveSHOWsoftware window. |
 |
Red frame - the mouse and keyboard commands do not work. The liveSHOWsoftware does not have the focus or the mouse is not over the liveSHOWsoftware window. |
 |
Terminates the global mouse/keyboard remote control and the liveSHOWsoftware can be operated normally again. |
 |
Opens the settings window for the configuration of the mouse, keyboard, presenter and DMX remote control.. |
Alternatively, the playback control can also be used - see Play Control.
Remote control via further external devices
AndroidIn addition to remote mouse control, there is also the option of controlling the process via an external device. At the moment this is only possible on Android devices. Thanks to the graphical user interface it is possible to control the process in a more targeted way.
Remote control via an external device, such as an Android smartphone, is explained under Android_Remote Settings.
MIDI
The program SPIT_MidiClient can be downloaded from the liveSHOWsoftware homepage (www.liveshowsoftware.de - menu: 'Download'). With this program it is possible to remote control the liveSHOWsoftware via MIDI controller - see also Trigger.