Settings) -> ( Settings) -> (
 DMX Input Settings)
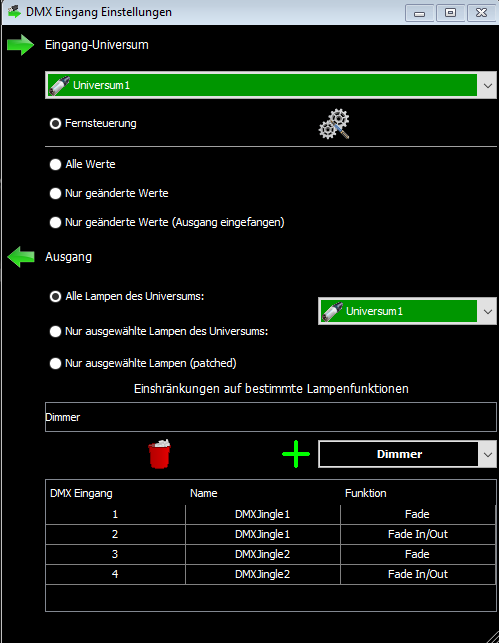

 Universum is connected to an input of a DMX interface and also the DMX interface with the computer is connected.
 Universum is connected to an input of a DMX interface, the DMX interface is NOT connected to the computer.
 Universe is NOT connected to the input of a DMX interface.
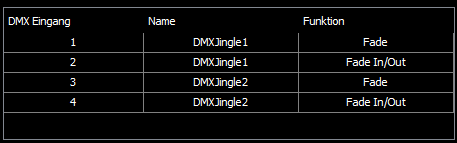
 you can open the 'Remote control settings (mouse keyboard DMX)' window
to set actions to be triggered with the DMX input channels.
you can open the 'Remote control settings (mouse keyboard DMX)' window
to set actions to be triggered with the DMX input channels.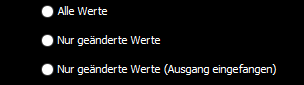
| All Values | All incoming DMX values of the input universe are used directly and sent to the selected output universe. Attention: This does not make sense if the timeline is currently running or DMX jingle is played, because otherwise the values of the timeline/jingle will be overwritten by the incoming values again and again!!! Usage: e.g. copying of complete lighting scenes from external sources. |
| Only changed Values | Only changed DMX values of the input universe are used and sent to the selected output universe. Usage: e.g. external control of certain lamp functions during a show. |
| Only changed values (output caught) | Only the DMX values of the input universe are taken over,
which have changed. And this only if the current present value of the
output universe was captured. The set value in the liveSHOWsoftware can differ from the current controller setting of the input (e.g. hardware mixer). If the controller at the DMX input is set to 0% and the output channel to be controlled is set to 75% in the liveSHOWsoftware, moving the input controller would cause a jump from 75% to a low value at the output. To avoid such a jump, the input controller must first be moved to the value of the output. If the output was captured (fetched), the further changes of the DMX input affect the output directly. Usage: e.g. the external readjustment of certain lamp functions during a show. |
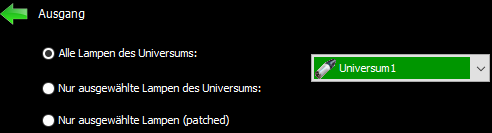
| All lamps of the universe | Here the DMX input values are sent to all all lamps of the output universe. The DMX input channels are transmitted one-to-one to the DMX output channels. |
| Only selected lamps of the universe | Here the DMX input values are sent only to the selected lamps of the output universe. Also here the DMX input channels are transmitted one to one to the DMX output channels, but the values of the NOT selected lamps are suppressed. |
 |
Here you can set the output universe. This is of interest for the two previous settings. For the last setting option, the assignment of the output universe is not relevant. |
| Selected lamps only (patched) | Here the selected lamps, regardless of their universe and DMX
start addresses, are assigned to the DMX input channels in order
(patch). The order is determined by which lamp is selected before another in the DMX stage view. Small example: You have two lamps Lamp1 and Lamp2. Lamp1 has 3 DMX channels and lamp2 has 4 DMX channels. If lamp1 is selected first and then lamp2, the DMX input values 1-3 control lamp1 and the DMX input values 4-7 control lamp2. If lamp2 is selected first and then lamp1, DMX input values 1-4 control lamp2 and DMX input values 5-7 control lamp2. |
 |
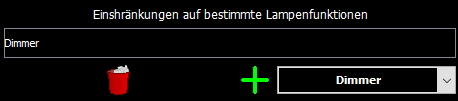
Adds the selected lamp function to the limitations |
 |
Removes the selected lamp function from the limitations |