DMX Light
Media
Editing of objects in the timeline
Szene transitions (scenebridges)
Terms in the software
Playing the Timeline / RemoteControl
Save the project
Export the project
Tips
In the menu ( Windows ->
  Timeline) you can open the Timeline window.
The heart of the software is the Timeline. In the Timeline, music pieces, lighting moods and media (pictures, videos) can be arranged, their fade in and fade out times can be set and scene transitions can be defined.
Thus, the entire show, or its expiration, is defined via the arrangement in the timeline - see Timeline.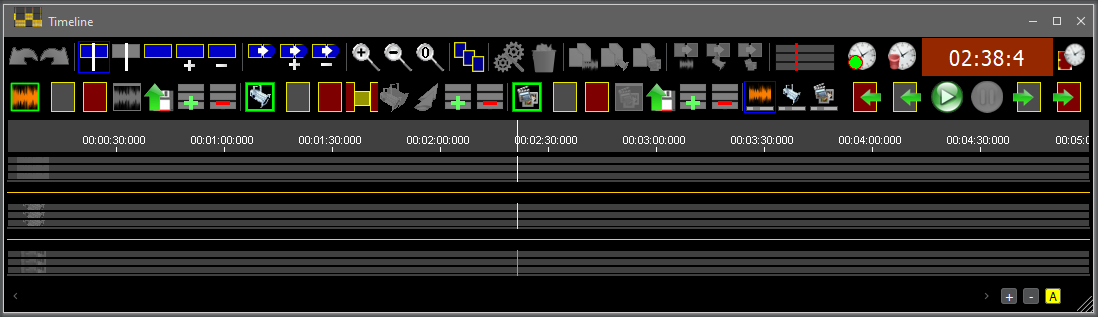
 The Timeline consists of three areas, each with several tracks:
in the upper section, music pieces can be arranged,
in the middle range light ambiences can be arranged
and media (pictures / videos) can be arranged in the lower area.
,
Sound data, lighting moods and media data can be added to the three areas, which can then be arranged in the Timeline as independent objects. A project is divided by scene transitions (scene bridges) which have a special functionality - see below.
The three sections of the Timeline can be played independently. Main scene transitions allow a synchronous start of a scene.
Sound
Step 1 Open sound file:
In the menu ( Sound) -> (
  Load Sound File), you can open a sound file.
Almost all standard formats can be opened. When you open a video, the sound is extracted automatically.
Internally the liveSHOWsoftware uses the wav audio format (PCM 44100 Hz, 2 channels, signed 16bit, little endian).
If other file formats are opened, they are automatically converted and a wav file is created, which gets the name of the original plus an extension (_PCM_44100_xxx.wav) and is placed in the folder of the original file.
The sound file is analyzed and graphics data are calculated. Therefore, the first loading of a sound file takes longer.
When the file is loaded, you will see the sound view:
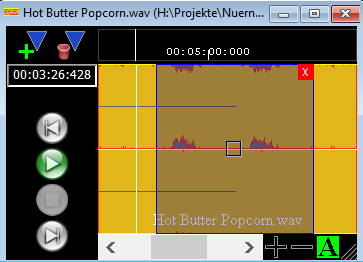
The sound data is displayed as curves. Here you can play the sound file, set cutting marker and specify an area (section).
Step 2 Drag sound to the timeline
To insert the whole sound file or a section (blue area, displayed above) into the timeline, click in the curves or the blue area, hold down the mouse key and drag the whole thing into the Timeline's sound part.
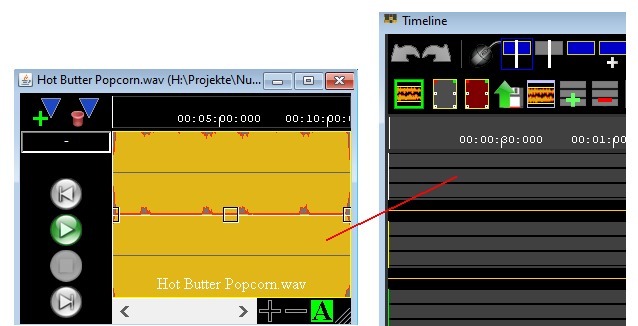
A sound object is now being created in the Timeline. There you can set fade in and out times, move the object, etc.
See editing of objects in the timeline
In the sound object, you can set fade in and fade out times, change the volume, etc.
Either you do this via the small squares or double-click on the object, a window opens with the object settings.
This is explained in more detail under Object settings.
Sound objects can be moved in the timeline, you can set fade transitions and insert scene transitions (scenebridges).
his is explained in more detail under Timeline.
Notes:
Note 2: File names should not contain special characters, umlauts, or punctuation marks (this could lead to problems in the file system of some operating systems).
Note:
a) Step 3 explained in more detail - Creating a lighting ambience
In the menu ( DMX-Light)->(
 DMX-Stageview) you can open the stage view.
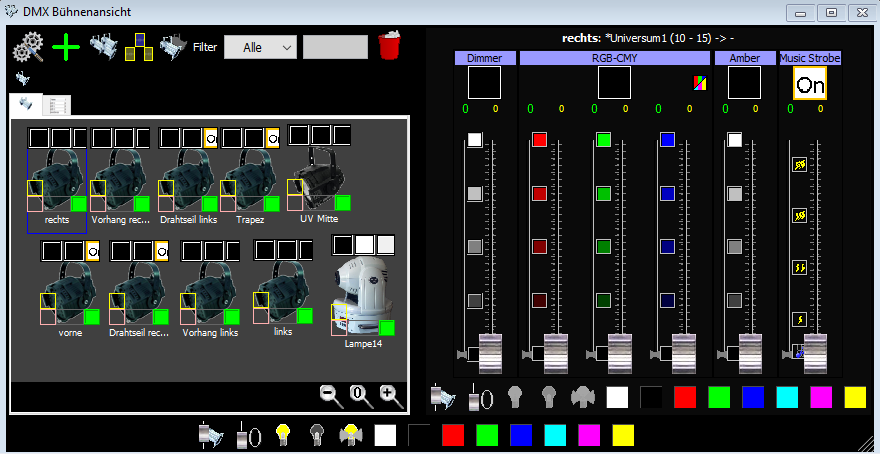
Here you can add and delete DMX devices to your stage, and change their settings. If you click with the left mouse in the middle of a DMX devices's picture,
a mixer that belongs to the device is displayed in the right part of the window. You can now adjust the device with the controls on the mixing console.
If you have made this procedure for all relevant devices, you can save this set as a lightambience.
To do this, in the menu (DMX-Light) -> ( DMX Lichtambiences), open the
window with all the stored lighting settings.
DMX Lichtambiences), open the
window with all the stored lighting settings.
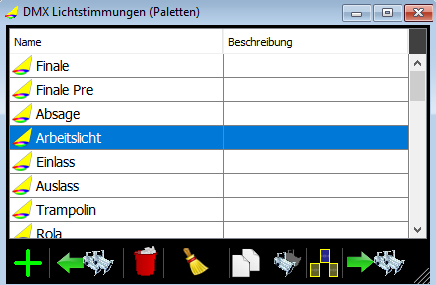
At the bottom left by clicking on the Button_ adds a new light ambience. In the newly created light ambience all currently set lamp values are stored.
You can freely assign the name of the light ambience by double-clicking the name in the table.
If you have selected a saved light (click with the mouse), you can overwrite the selected lighting by the currently set light in the DMX Stageview with the button .
.
If you want to control a light ambience, click on the light ambience to select it and then on , the stored lamp values will be sent to the lights.
b) Step 3 explained in more detail - Dragging a lighting ambience into the timeline
You can add a selected light ambience to the timeline by clicking on it with the left mouse button, holding down the button and dragging it into the light section of the timeline.
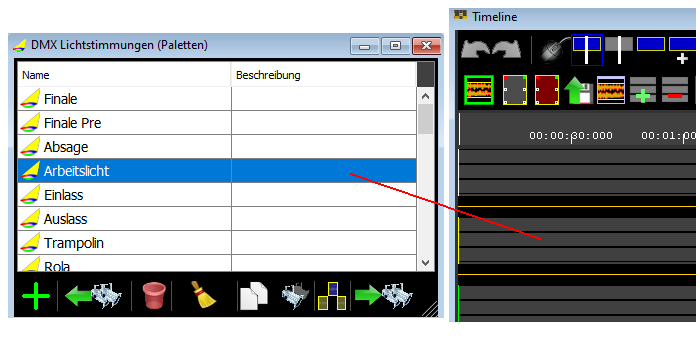
A light object is now being created in the Timeline. In the light object, you can set fade in and fade out times, change the brightness, etc.
See editing of objects in the timeline
Notes:
Step 1 Open media file
In the menu ( Medien) -> (
 Mediendatei
Laden) you can open a media file. Images (JPG, GIF, PNG), texts (rtf, html - with pure text) and videos (many standard formats) can be opened.
Mediendatei
Laden) you can open a media file. Images (JPG, GIF, PNG), texts (rtf, html - with pure text) and videos (many standard formats) can be opened.
When the file is loaded, you will see the Media view:
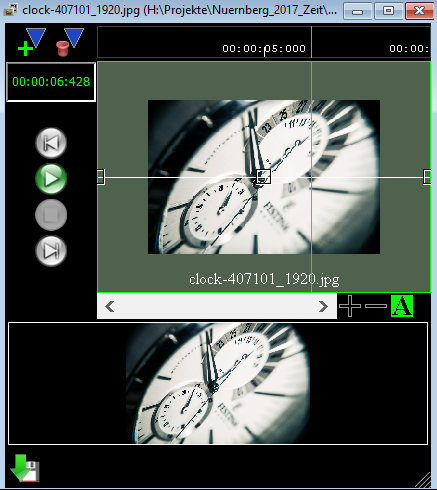
The upper part of the window is almost identical to the window of the sound files. Here you see the first, middle and last image of the loaded video, or three times the loaded image.
In the lower section you can see a preview in which the movie will run when you click on the Play button on the left. You can also set edge markers here and define a range.
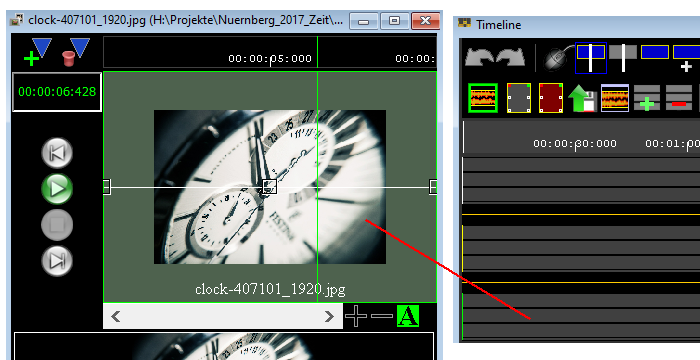
Step 2 Drag media to the timeline
To draw the entire media file or a section (area, shown in blue) into the timeline, click in the upper part or the blue area, hold down the mouse key and drag it to the media part of the Timeline.

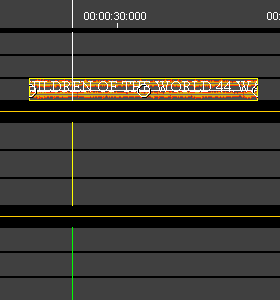
In the Timeline, a media object is now being created: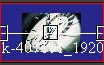 In the media object you see the first, the middle and the last image of
your movie, text and pictures are displayed three times.
In the media object you see the first, the middle and the last image of
your movie, text and pictures are displayed three times.
See editing of objects in the timeline
Note:
Note 2: File names should not contain special characters, umlauts, or punctuation marks (this could lead to problems in the file system of some operating systems).
Note: If a video is jerky or hangs, you can use the Video/Sound Converter to convert the video. Usually it helps to select a smaller frame size and/or a lower frame rate.
Objects in the timeline
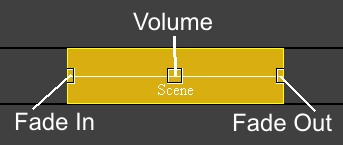
All objects have handles for fade in, fade out,
and volume (for sound objects this is the volume, and for dimmed objects, the dimmer channel is affected, the transparency is set for media objects).
 These handles can be moved with the left mouse.
A double-click resets it to its default position.
The handles snap to object borders of other objects!
In the Timeline there are a number of mouse modes in the upper left corner that help to select objects, remove objects from selection, etc. - see Timeline
The Universal Mode is set by default.
The objects are divided into invisible areas, which are important for their editing:
 The white bordered areas serve to lengthen or shorten the objects.
A click on the free space between the white areas sets the play cursor to this position if the Universal modeis set.
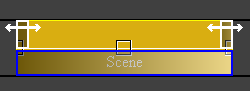
A click on the blue framed area selects an object - see also Selecting Objects.
Several objects can be selected by holding down the 'Ctrl' or 'Shift' key.
When you move the mouse over the areas, the mouse cursor changes accordingly.
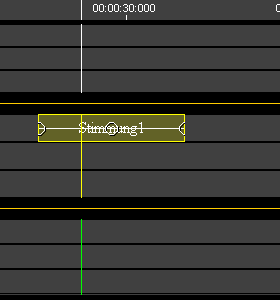
When an object is selected it is displayed in blue:
Note: A double-click on an object opens the object settings. All object properties can be set there alphanumerically.
The two buttons (scene transition for one area)
  (main transition across all areas) are available in rthe Timeline for the area sound. light and media.
A click on or creates a scene bridge or main scene bridge at the position of the corresponding play cursor.
Scene transitions structure a show, from them a scene book is created, with this the show can also be controlled.

A scene transition has the task of enabling a defined transition from one scene to another scene.
These scene transitions can be played back at any time, the effect is
This allows you to switch from one scene to another scene at any time - see Timeline.
Scene transitions
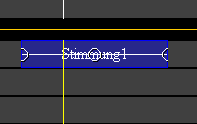
Scene transitions extend over all tracks and are displayed transparently.
Scene transitions have the same invisible areas as objects:
Note: A double-click on an scene transition opens the object settings. All object properties can be set there alphanumerically and the name of the scene transition can be changed.
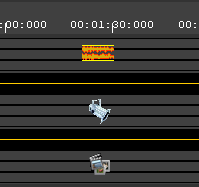
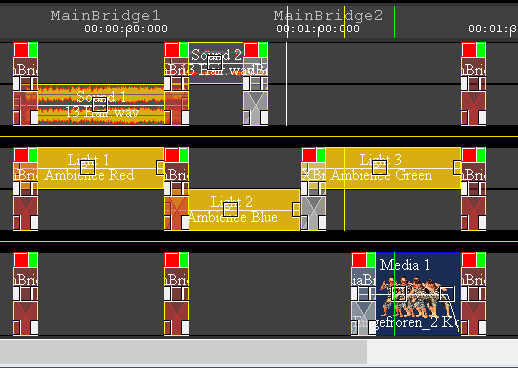
An arrangement with objects and scene transitions could look like this in the timeline
Media
Editing of objects in the timeline
Szene transitions (scenebridges)
Terms in the software
Playing the Timeline / RemoteControl
Save the project
Export the project
Tips
Timeline
With the help of the liveShow software a stage show can be programmed and played. For programming a stage show, you do not need any programming skills and no knowledge of how hardware mixers work. Everything is graphically created.In the menu (
Windows -> Timeline) you can open the Timeline window.The heart of the software is the Timeline. In the Timeline, music pieces, lighting moods and media (pictures, videos) can be arranged, their fade in and fade out times can be set and scene transitions can be defined.
Thus, the entire show, or its expiration, is defined via the arrangement in the timeline - see Timeline.
The Timeline consists of three areas, each with several tracks:in the upper section, music pieces can be arranged,
in the middle range light ambiences can be arranged
and media (pictures / videos) can be arranged in the lower area.
,
Sound data, lighting moods and media data can be added to the three areas, which can then be arranged in the Timeline as independent objects. A project is divided by scene transitions (scene bridges) which have a special functionality - see below.
The three sections of the Timeline can be played independently. Main scene transitions allow a synchronous start of a scene.
Sound
Step 1 Open sound file:In the menu (
Sound) -> ( Load Sound File), you can open a sound file. Almost all standard formats can be opened. When you open a video, the sound is extracted automatically.
Internally the liveSHOWsoftware uses the wav audio format (PCM 44100 Hz, 2 channels, signed 16bit, little endian).
If other file formats are opened, they are automatically converted and a wav file is created, which gets the name of the original plus an extension (_PCM_44100_xxx.wav) and is placed in the folder of the original file.
The sound file is analyzed and graphics data are calculated. Therefore, the first loading of a sound file takes longer.
When the file is loaded, you will see the sound view:
The sound data is displayed as curves. Here you can play the sound file, set cutting marker and specify an area (section).
Step 2 Drag sound to the timeline
To insert the whole sound file or a section (blue area, displayed above) into the timeline, click in the curves or the blue area, hold down the mouse key and drag the whole thing into the Timeline's sound part.
A sound object is now being created in the Timeline.
There you can set fade in and out times, move the object, etc.See editing of objects in the timeline
In the sound object, you can set fade in and fade out times, change the volume, etc.
Either you do this via the small squares or double-click on the object, a window opens with the object settings.
This is explained in more detail under Object settings.
Sound objects can be moved in the timeline, you can set fade transitions and insert scene transitions (scenebridges).
his is explained in more detail under Timeline.
Notes:
- The sound is played locally on the computer, the sound cards to be used can be set under menu ( Sound) -> (
 Sound Cards).
 - Internally, the liveSHOWsoftware uses 10 sound lines. Each channel of a sound object can be assigned to one or more sound lines. With the sound card settings can be assigned with each channel of a sound card, which sound lines this channel is to play. This way, sound objects can be distributed to different sound cards or a multi-channel sound can be played back. - see Sound Lines.
- Sound files, even when saving a project, are left in the place from where they were opened. Only when a project is exported (Menu
 Project) -> (
 export Project), the sound files are copied into the project folder.
You can copy this project folder to another computer, it contains all necessary files of a project.
Note 2: File names should not contain special characters, umlauts, or punctuation marks (this could lead to problems in the file system of some operating systems).
Note:
- With Windows laptops, there can
be problems with the headphone output, since the system is usually set
so that the sound card is put into sleep mode after some time of
inactivity and must first be woken up again when it is used again.
This leads to time delays when starting playback.
The simplest solution is to use an external USB sound card instead of the headphone output.
See also: Sound problem under Windows.
Light DMX
see also: Tutorial LightStep 1 Connect DMX interface and add DMX universe:
In the menu ( Settings -> DMX Hardware Settings) you can open the DMX hardware settings window.
There you can add DMX interfaces and create DMX universes.
See: DMX Hardware Settings
Step 2 Add lamps to stage view and adjust light
In the menu(DMX-Light)->( DMX-Stageview) you can open the DMX Stageview window.
There lamps (devices) can be added and adjusted.
See DMX Stageview
Step 3 Create lighting ambieneces and drag lighting ambiences into the timeline
A set light can be stored in a lighting ambience.
A lighting ambience can be dragged into the timeline.
See Tutorial DMX-Light and DMX light ambiences
In the menu ( Settings -> DMX Hardware Settings) you can open the DMX hardware settings window.
There you can add DMX interfaces and create DMX universes.
See: DMX Hardware Settings
Step 2 Add lamps to stage view and adjust light
In the menu(
DMX-Light)->( DMX-Stageview) you can open the DMX Stageview window.There lamps (devices) can be added and adjusted.
See DMX Stageview
Step 3 Create lighting ambieneces and drag lighting ambiences into the timeline
A set light can be stored in a lighting ambience.
A lighting ambience can be dragged into the timeline.
See Tutorial DMX-Light and DMX light ambiences
a) Step 3 explained in more detail - Creating a lighting ambience
In the menu (
DMX-Light)->( DMX-Stageview) you can open the stage view.Here you can add and delete DMX devices to your stage, and change their settings. If you click with the left mouse in the middle of a DMX devices's picture,
a mixer that belongs to the device is displayed in the right part of the window. You can now adjust the device with the controls on the mixing console.
If you have made this procedure for all relevant devices, you can save this set as a lightambience.
To do this, in the menu (
DMX-Light) -> (DMX Lichtambiences), open the
window with all the stored lighting settings.At the bottom left by clicking on the Button_
adds a new light ambience. In the newly created light ambience all currently set lamp values are stored.You can freely assign the name of the light ambience by double-clicking the name in the table.
If you have selected a saved light (click with the mouse), you can overwrite the selected lighting by the currently set light in the DMX Stageview with the button
.If you want to control a light ambience, click on the light ambience to select it and then on
, the stored lamp values will be sent to the lights.b) Step 3 explained in more detail - Dragging a lighting ambience into the timeline
You can add a selected light ambience to the timeline by clicking on it with the left mouse button, holding down the button and dragging it into the light section of the timeline.
A light object is now being created in the Timeline.
In the light object, you can set fade in and fade out times, change the brightness, etc.See editing of objects in the timeline
Notes:
- Light is only
transmitted to headlights when they are assigned to a DMX universe and
this is in turn connected to a DMX hardware.
This can be set in the DMX hardware settings under the menu (DMX-Licht) -> ( DMX hardware settings)
 - If a suitable device type is not available for your device, you can create a device type yourself, see menu (
 DMX-Light) -> (
 DMX Device Editor)
Media (pictures/movies)
see - Tutorial Media
Step 1 Open media file
In the menu (
Medien) -> (Mediendatei
Laden) you can open a media file. Images (JPG, GIF, PNG), texts (rtf, html - with pure text) and videos (many standard formats) can be opened.When the file is loaded, you will see the Media view:
The upper part of the window is almost identical to the window of the sound files. Here you see the first, middle and last image of the loaded video, or three times the loaded image.
In the lower section you can see a preview in which the movie will run when you click on the Play button on the left. You can also set edge markers here and define a range.
Step 2 Drag media to the timeline
To draw the entire media file or a section (area, shown in blue) into the timeline, click in the upper part or the blue area, hold down the mouse key and drag it to the media part of the Timeline.
In the Timeline, a media object is now being created:
In the media object you see the first, the middle and the last image of
your movie, text and pictures are displayed three times.See editing of objects in the timeline
Note:
-
Media objects that lie on top of each other are also played back simultaneously The content of the objects in an upper track is displayed in front of the contents of an underlying track.
If you place an image frame with a transparent surface in the uppermost track and a film in the second track, the film is visible through the picture frame. - Media are not played directly over the timeline, but via an extra program, the LiveShow_Media. software
Media is not played directly via the timeline, but via a MediaServer, this is an extra program LiveShow_Media. You can download the liveSHOW_Media software at www.liveSHOWsoftware.de.
For each media object, you can decide on which media server you want to play it (double-click on the object).
Media servers can be managed under the menu ( Media) -> ( Media Server) .
 - Media files, even when saving a project, are left in the place from where they were opened. Only when a project is exported (Menu Project) -> ( export Project), the media files are copied into the project folder.
You can copy this project folder to another computer, it contains all necessary files of a project.
Note 2: File names should not contain special characters, umlauts, or punctuation marks (this could lead to problems in the file system of some operating systems).
Note: If a video is jerky or hangs, you can use the Video/Sound Converter to convert the video. Usually it helps to select a smaller frame size and/or a lower frame rate.
Editing of objects in the timeline
Moving objects
Only objects that are selected (highlighted in blue) can be moved.
If several objects are selected, these objects can be moved together.
Only objects that are selected (highlighted in blue) can be moved.
If several objects are selected, these objects can be moved together.
All objects have handles for fade in, fade out,
and volume (for sound objects this is the volume, and for dimmed objects, the dimmer channel is affected, the transparency is set for media objects).
These handles can be moved with the left mouse.A double-click resets it to its default position.
The handles snap to object borders of other objects!
In the Timeline there are a number of mouse modes in the upper left corner that help to select objects, remove objects from selection, etc. - see Timeline
The Universal Mode
is set by default.The objects are divided into invisible areas, which are important for their editing:
The white bordered areas serve to lengthen or shorten the objects.A click on the free space between the white areas sets the play cursor to this position if the Universal mode
is set. A click on the blue framed area selects an object - see also Selecting Objects.
Several objects can be selected by holding down the 'Ctrl' or 'Shift' key.
When you move the mouse over the areas, the mouse cursor changes accordingly.
When an object is selected it is displayed in blue:
Note: A double-click on an object opens the object settings. All object properties can be set there alphanumerically.
Szene transitions (Scenebridges) in the Timeline
Scene transitions are available for the sound, light and media. In addition, there are so-called main scenes transitions, for all three areas sound, light and media together.The two buttons
(scene transition for one area) (main transition across all areas) are available in rthe Timeline for the area sound. light and media.A click on
or creates a scene bridge or main scene bridge at the position of the corresponding play cursor.Scene transitions structure a show, from them a scene book is created, with this the show can also be controlled.
A scene transition has the task of enabling a defined transition from one scene to another scene.
These scene transitions can be played back at any time, the effect is
- the currently running scenery (no matter where the PlayCursor is currently) will be fadet out
- the scenery under the scene transition is fadet in
- main scene transitions synchronize the playback cursors
Scene transitions
Scene transitions extend over all tracks and are displayed transparently.
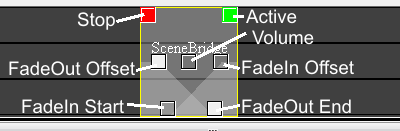
 Stop Stop |
filled: The PlayCursor will stop when it reaches the scene transition NOT filled The PlayCursor will go into the scene transition |
 Active Active |
filled: Scene transition is active NOT filled: The PlayCursor will jump to the next scene transition and skip the deactivated scene transition. |
 FadeOut Offset and End FadeOut Offset and End |
Determine the beginning and the length of the FadeOut operation |
 FadeIn-Offset and -Start FadeIn-Offset and -Start |
Determine the beginning and the length of the FadeIn operation |
Scene transitions have the same invisible areas as objects:
|
In the upper half of a scene transition, the white bordered areas serve to lengthen or shorten the scene transition. The remaining area is used to set the PlayCursor or to mark the scene transition, depending on the mouse mode - see Selecting objects. |
Note: A double-click on an scene transition opens the object settings. All object properties can be set there alphanumerically and the name of the scene transition can be changed.
An arrangement with objects and scene transitions could look like this in the timeline
Terms in the software
- Light ambience
All values / settings of all DMX devices are saved in a light ambience. - Lightobject
If a light ambience is drawn into the timeline, a light object is generated.
In a light object, the fade in / fade out times, the duration etc. are set and stored.
Each light object has a light ambience as a source, from which the values for each individual device originate. - Soundobject
If a sound or a range is dragged into the timeline, a sound object is generated.
In a sound object, the fade in / fade out times are set and stored.
A sound object has a sound file as the source from which the sound information (music) originates. - Mediaobject
If a media file or a range is dragged into the timeline, a media object is created.
In a media object, the fade in / fade out times are set and stored.
A media object has a media file as the source from which the media information (image, video data) originates. - Scenebridge (transition)
In the Timeline you can create scene transitions (scenebridges) as desired. There can be pure sound transitions, pure light transitions and pure media transitions, but also main scene transitions consisting of coupled sound, light and media transitions.
In the scene transitions, you can specify how to switch from one scene to the next. - Scene (Cues)
A scene is an arrangement of light and sound objects between two scene transitions. A scene corresponds approximately to a cue.
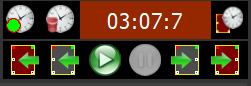
 , stop
  ,
,
 , jump to previous scene/main scene transition

 .
.
 Settings) -> (

 save Project under)
 Help).